
Hi everyone, welcome to the blog today. Serene here from Sereneshandmade with a simple and exciting new way to turn a simple MDF photo frame into a lovely Christmas wall decor. If you want, it can be used for displaying your photos too. 1.Take an MDF photo frame, separate the base and keep aside. 2.Paint the top part with archival multi-surface paints -Tangy Tomato and the edges roughly with chalk paints Charcoal with some spillover to the red part. 3.Take the rear side of the Read more…
Category: DIY & Kids Craft
Vintage 3D Christmas Photo Frames
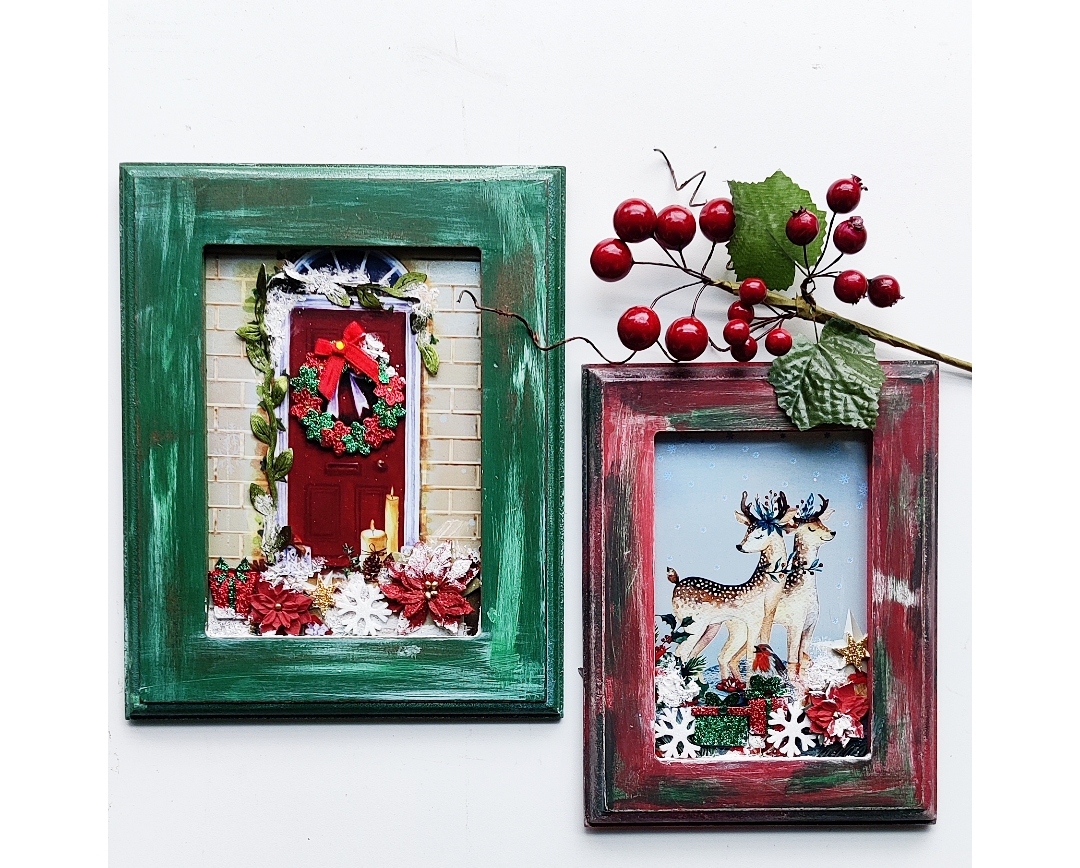
Hey Crafty People, This is Manasa Priya from Upcycled! Today I am going to show you how to make some festive home decor for Christmas. These are some wall frames with a 3D effect that also give a vintage vibe. For this project, first I prepped the MDF frames . I used Little Birdie Chalk Paints. Since it’s for Christmas, I selected green, red, and white. I created a distressed effect by painting and sanding. Sealed it with Little Birdie Matte Decor Varnish to complete the outer frame. Now, Read more…
DIY Decoupage Kitchen Decor
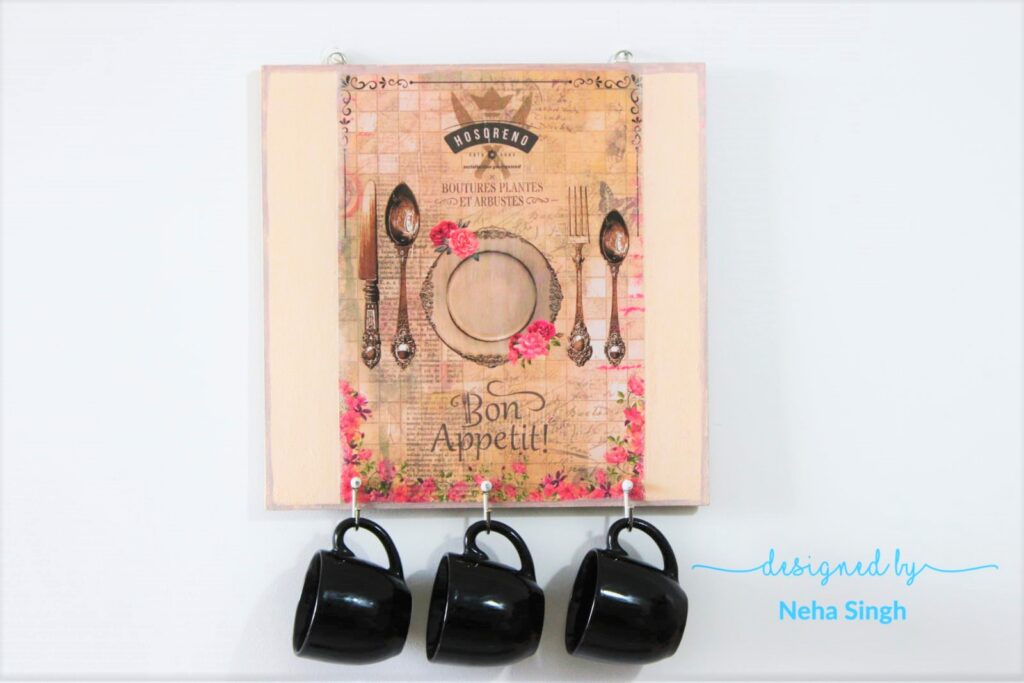
Hello crafters, Neha here and for todays blog I decided to make something for my Kitchen Wall and so I came up with this Wall Panel which has hooks for multipurpose utility. For this project I have used a square MDF Decorable Blank and Decoupage Filament Paper – Bon Appetite. I started by roughly applying gesso over the base. I covered only the area where I planned to paste the paper. After that, I painted the remaining area with Butternut Squash-Chalk paint and left to for drying. After Read more…
Quilled Heart Art
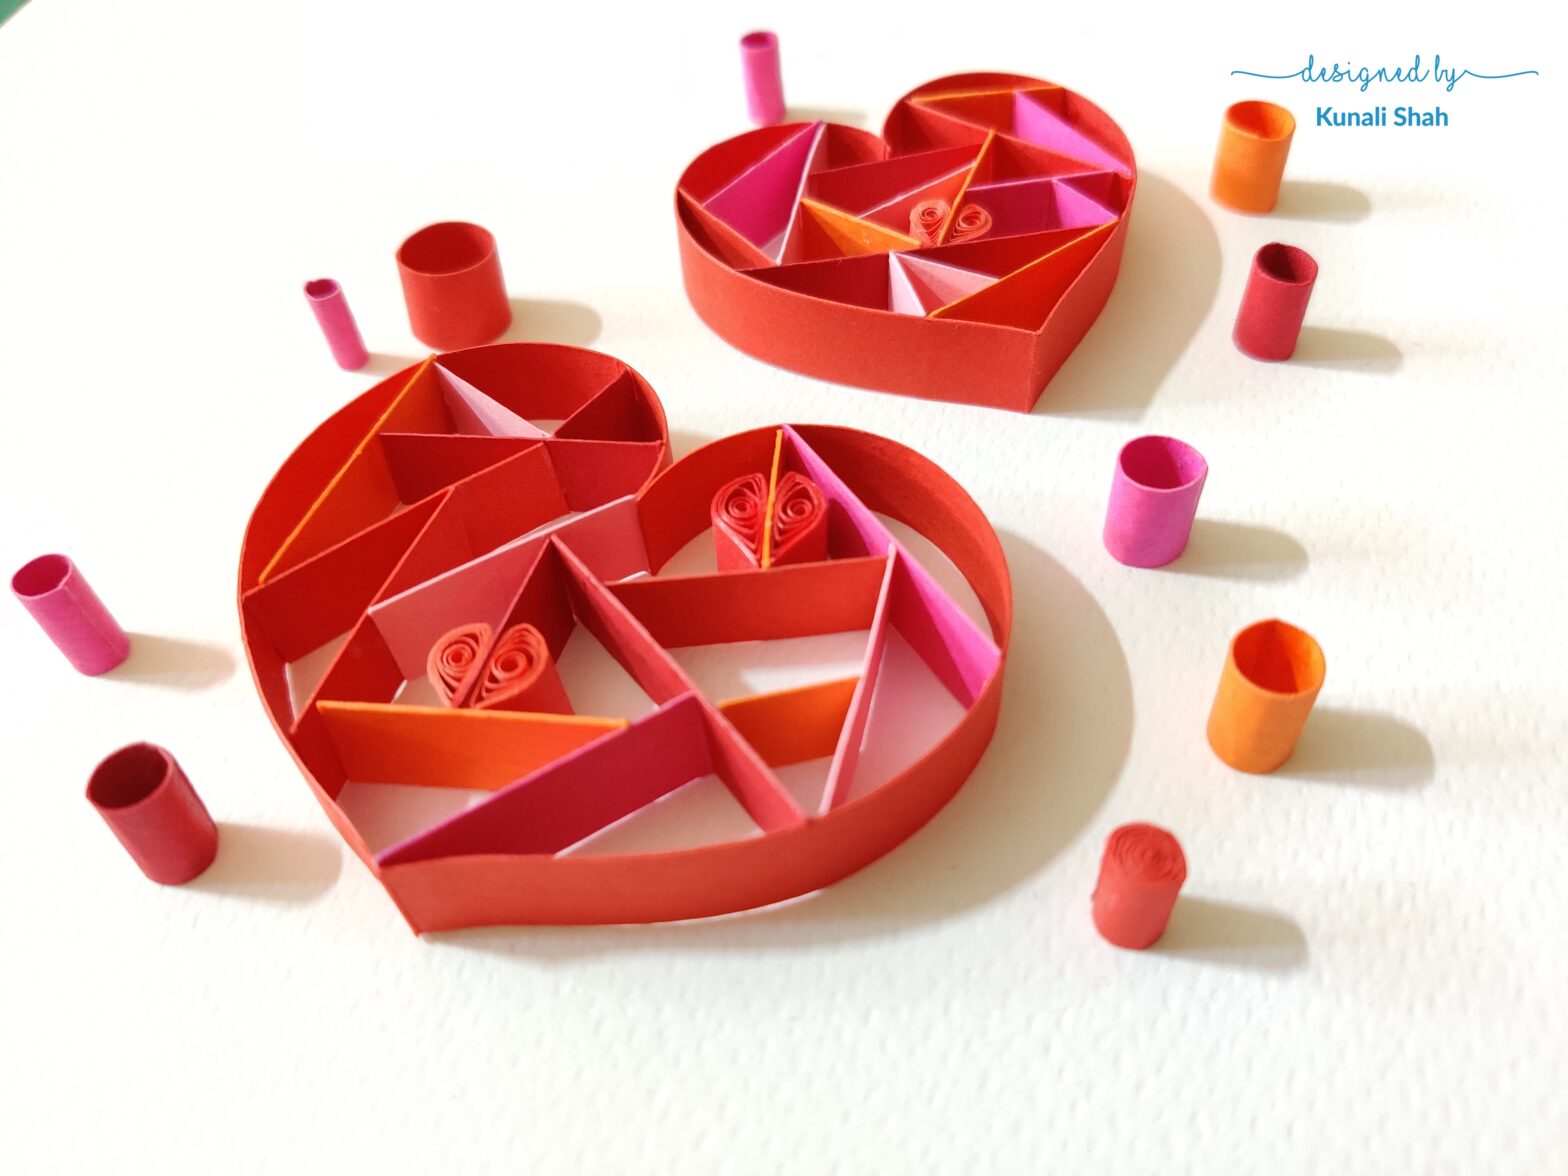
Hi, I’m Kunali and I believe that love is a feeling that is expressed throughout the year. Show your near and dear ones your love and appreciation through this lovely and multi-faceted craft which I’ve shown below. So, let’s start making a cute quilled and line art heart. To begin with, I have used multiple versions of red and pink card stock. I have cut them in 10 mm wide strips. Next, I’ve taken an 8 inch long strip and folded it in half. Then, curve the ends as shown and stick Read more…
Vibrant Quilled & Mirrored Mandala Dangler
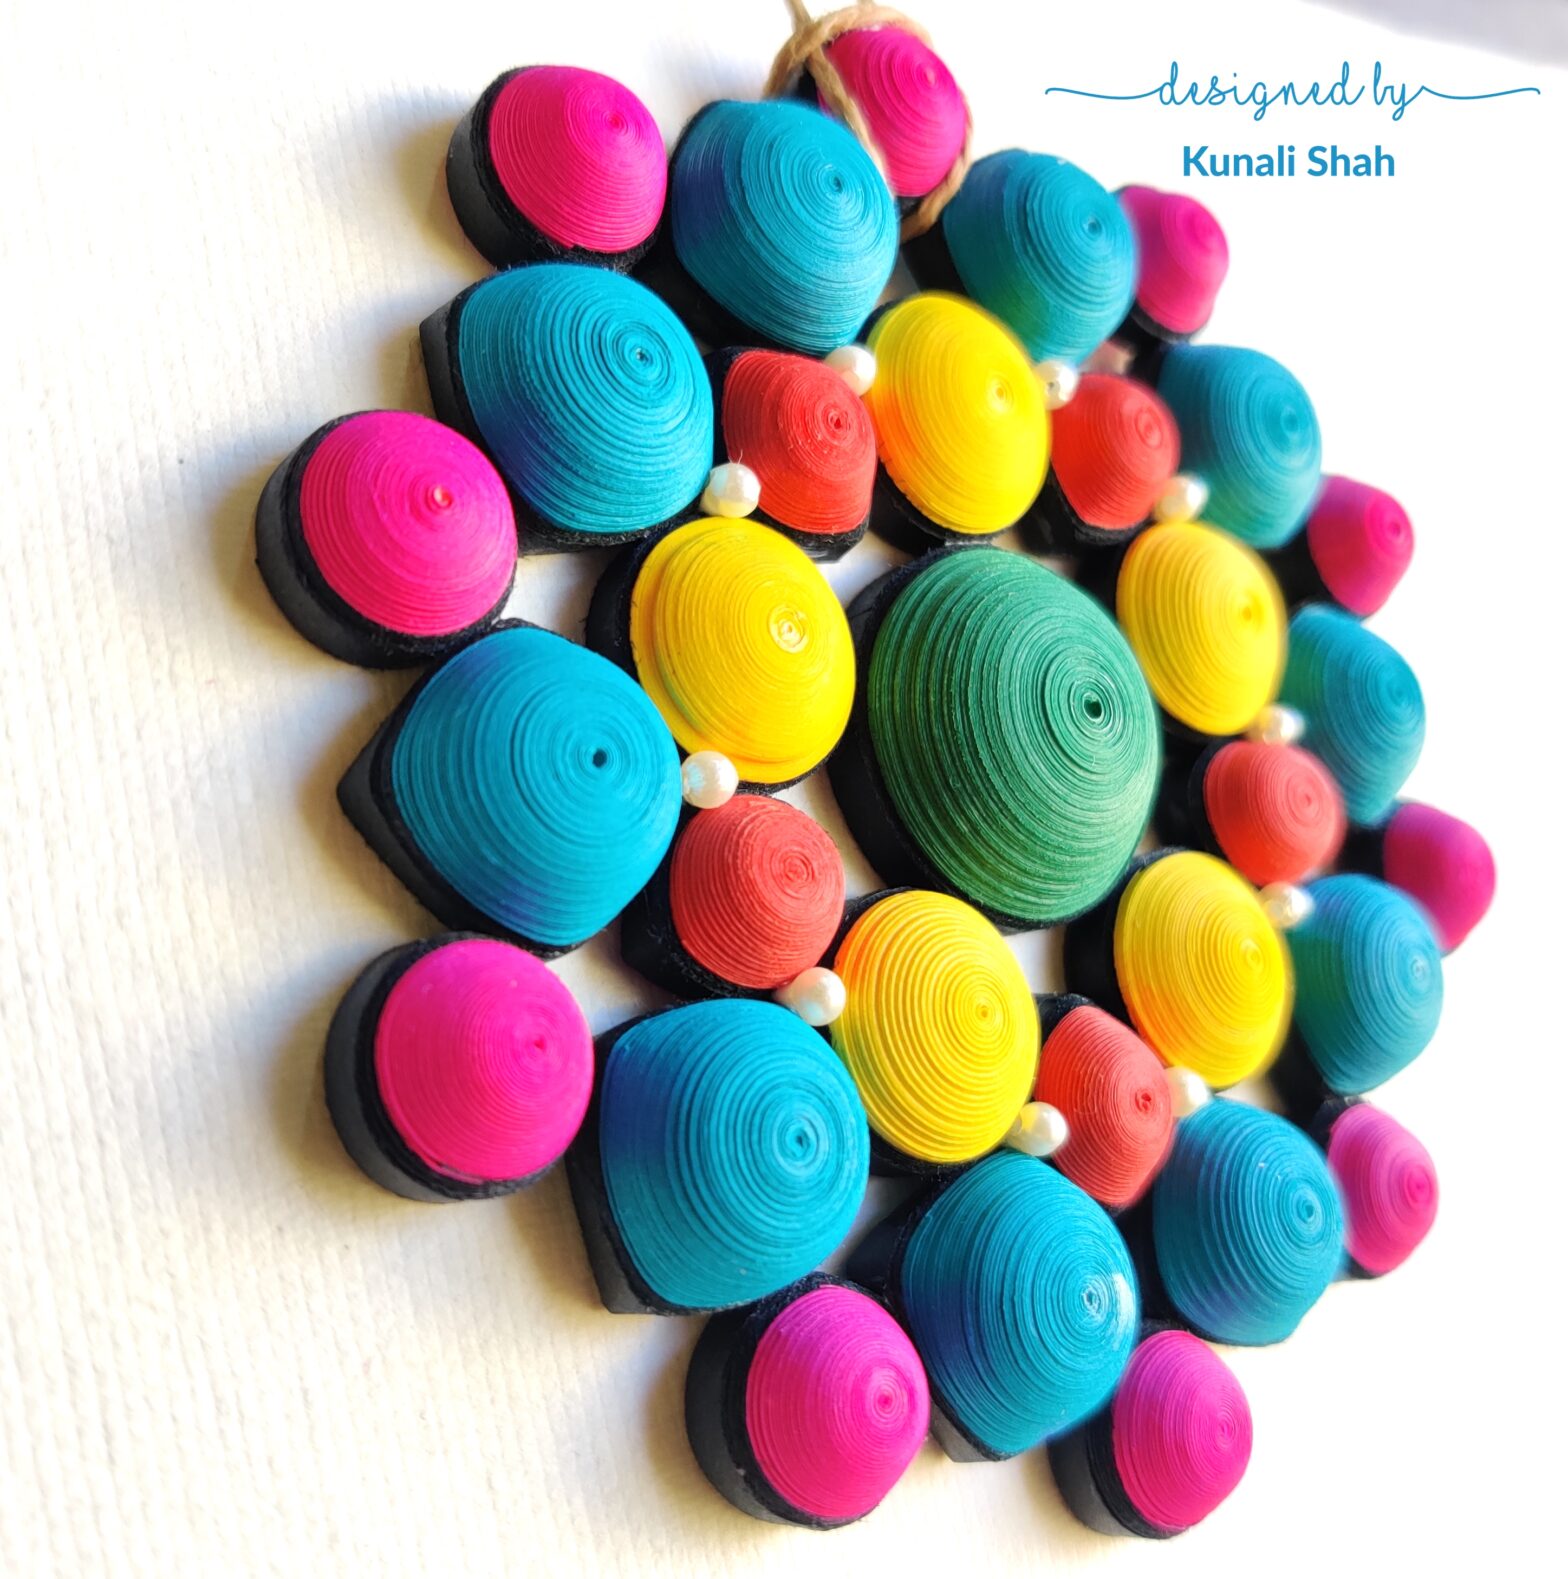
Hi, I’m Kunali and today I’m sharing a tutorial for an absolutely cute and vibrant dangler. It’s fairly simple but looks stunning. For this dangler, I’m going to be using multiple colours of 3 mm quilling strips, some glue and mirrors, and some small pearls for decoration. So, let’s begin. For starters, I’ve used emerald green, bright red, hot pink, yellow, black and turquoise strips. We’ll be making a simple mandala design using these strips. For the centre most coil, Read more…
Frozen Theme Decor Plate
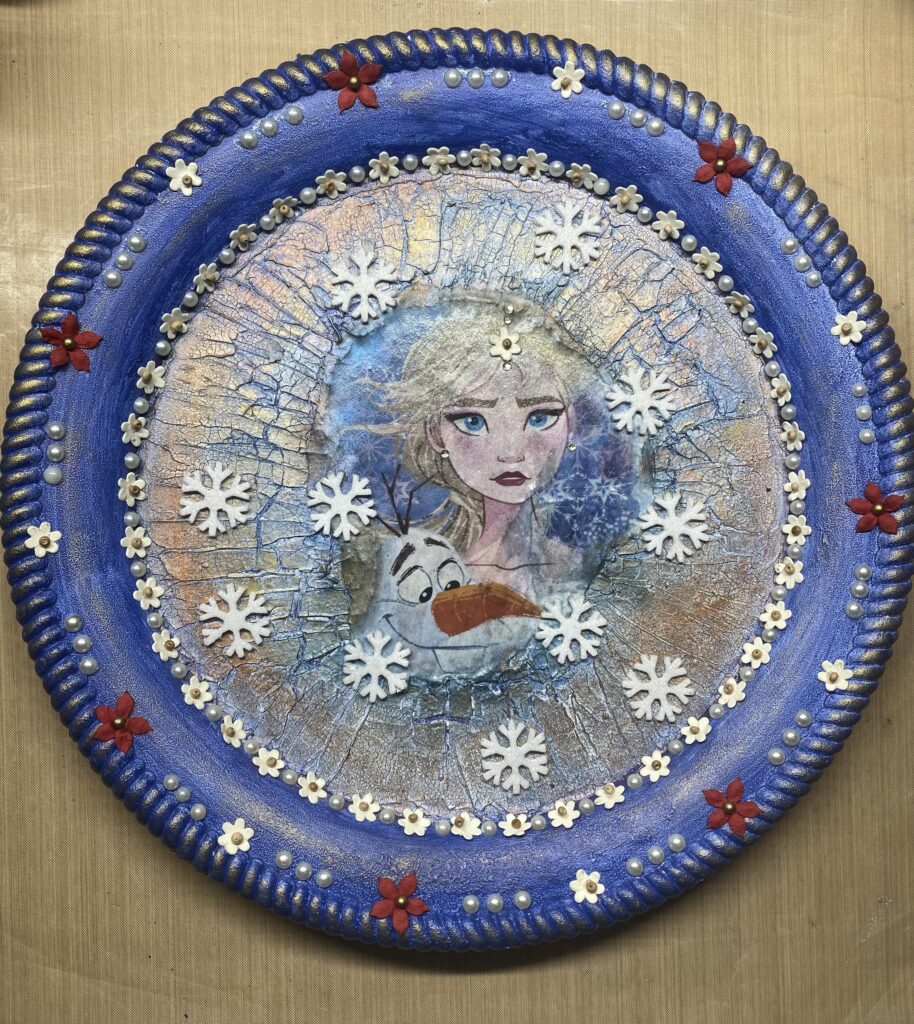
Hello! Art lovers! Shweta Singh this side. A very warm welcome to all of you on my blog . Today let’s alter a dry fruit plate together and turn it into a wall decor plate. STEP-1 I took a plastic dry fruit plate and decided to use Itsy Bitsy’s newly launched ‘Frozen’ theme decoupage paper. I tore the print from it. Then, I adhered it to the centre of it and primed it with white gesso from the store. Then I applied multi-surface chalk paint. after if dried, I applied a thick layer of crackle Read more…
Wall Hanging with MDF Coasters
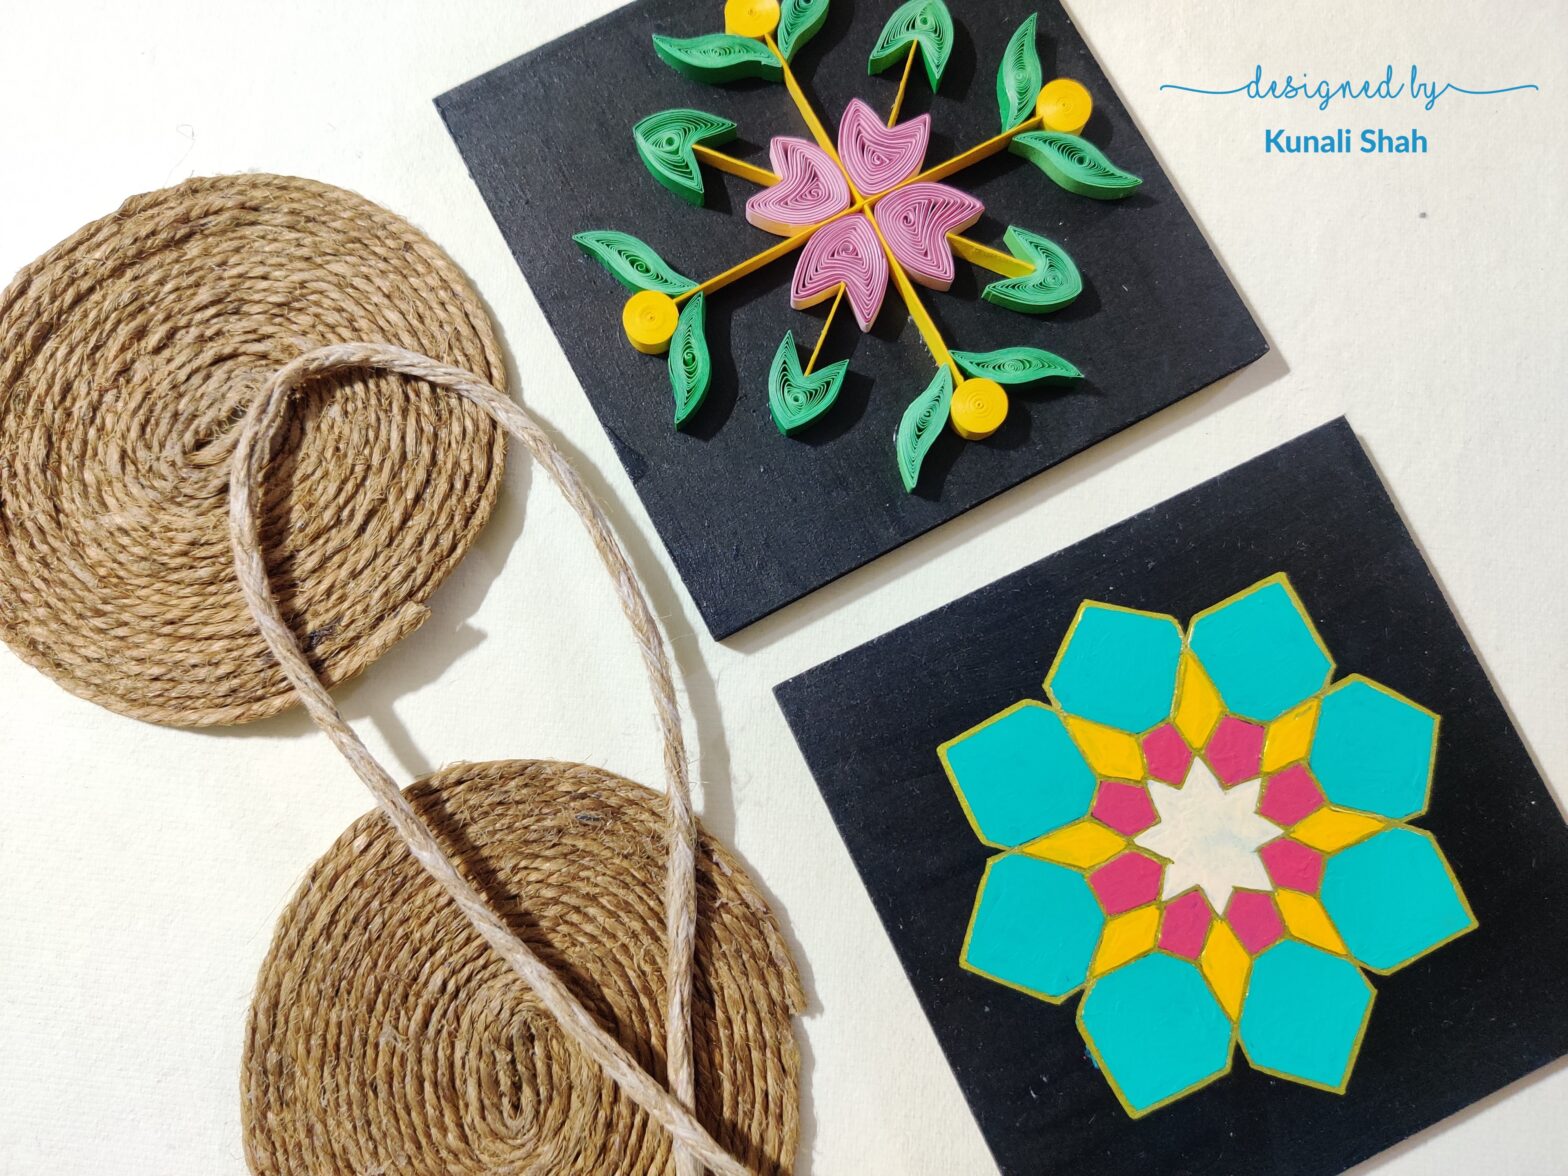
Hi! I’m Kunali and today I’m going to show you how I used simple MDF coasters to create a cute wall hanging piece. This can be used to brighten up your home and it’ll also make a great gift. It’ll be ready in just a few hours and you can show off your creative prowess to your near and dear ones. The best part about this art is that you can change the sides depending on your mood or liking. Let’s begin. I have started with taking 2 MDF coasters and coated them with black acrylic paint Read more…
DIY Floral Decoupage Clock

Hello crafters, Neha here and todays blog is about floral themed wall clock. For this project I have used Little birdie PVC Clock face round- White , 10 inch Dia as base and Mdf clock- 10 inch for the numbers. I started by cutting the decoupage paper according to the size of the PVC Base using scissors. After that, I applied the decoupage paper over the base using Deco Magic glue. After drying, I applied another layer of Deco Magic glue over the print in order to seal it further Read more…
Bottle Art
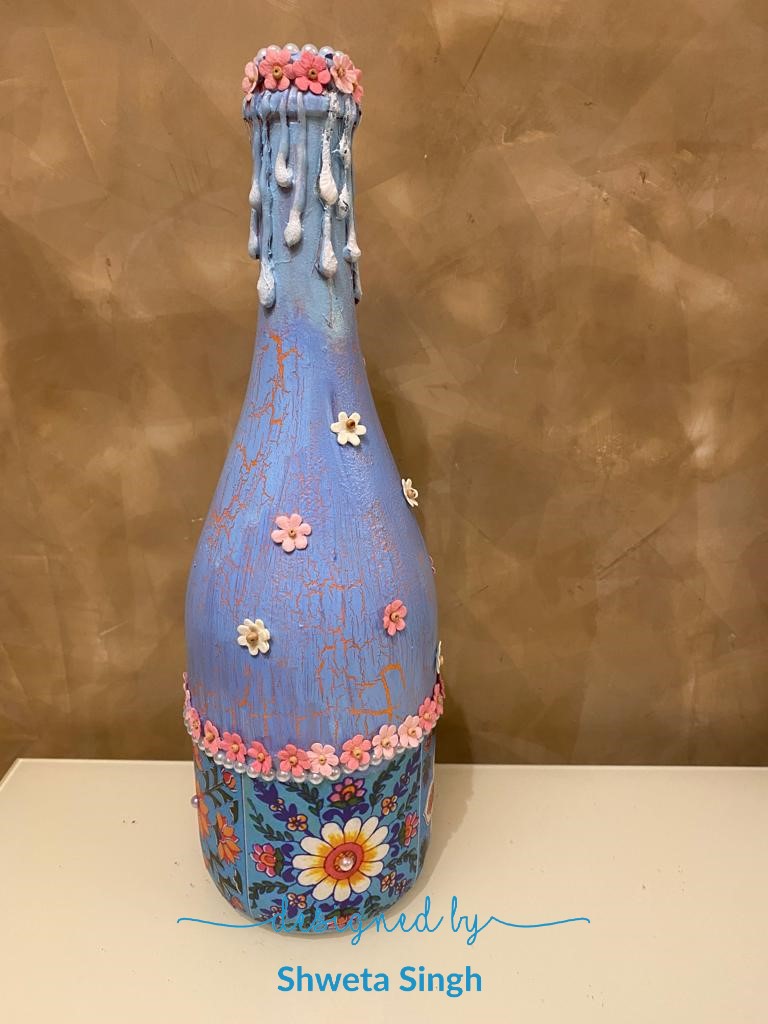
Hello! Art lovers! Shweta this side. A very happy New Year to you all! Let’s do some bottle art together. STEP 1 I took a used bottle and primed it with white gesso. Using a hot glue gun I tried to mimic a water trickling effect. SECOND STEP I took Itsy Bitsy filament paper, cut it according to my needs and adhered it to the surface with the help of Deco Magic glue. Then I sealed it with Deco Magic glue. THIRD STEP Then I took Little Birdie Multi-surface Paint in the Read more…
Snowflake and Christmas Tree Home Decor Kunali Shah
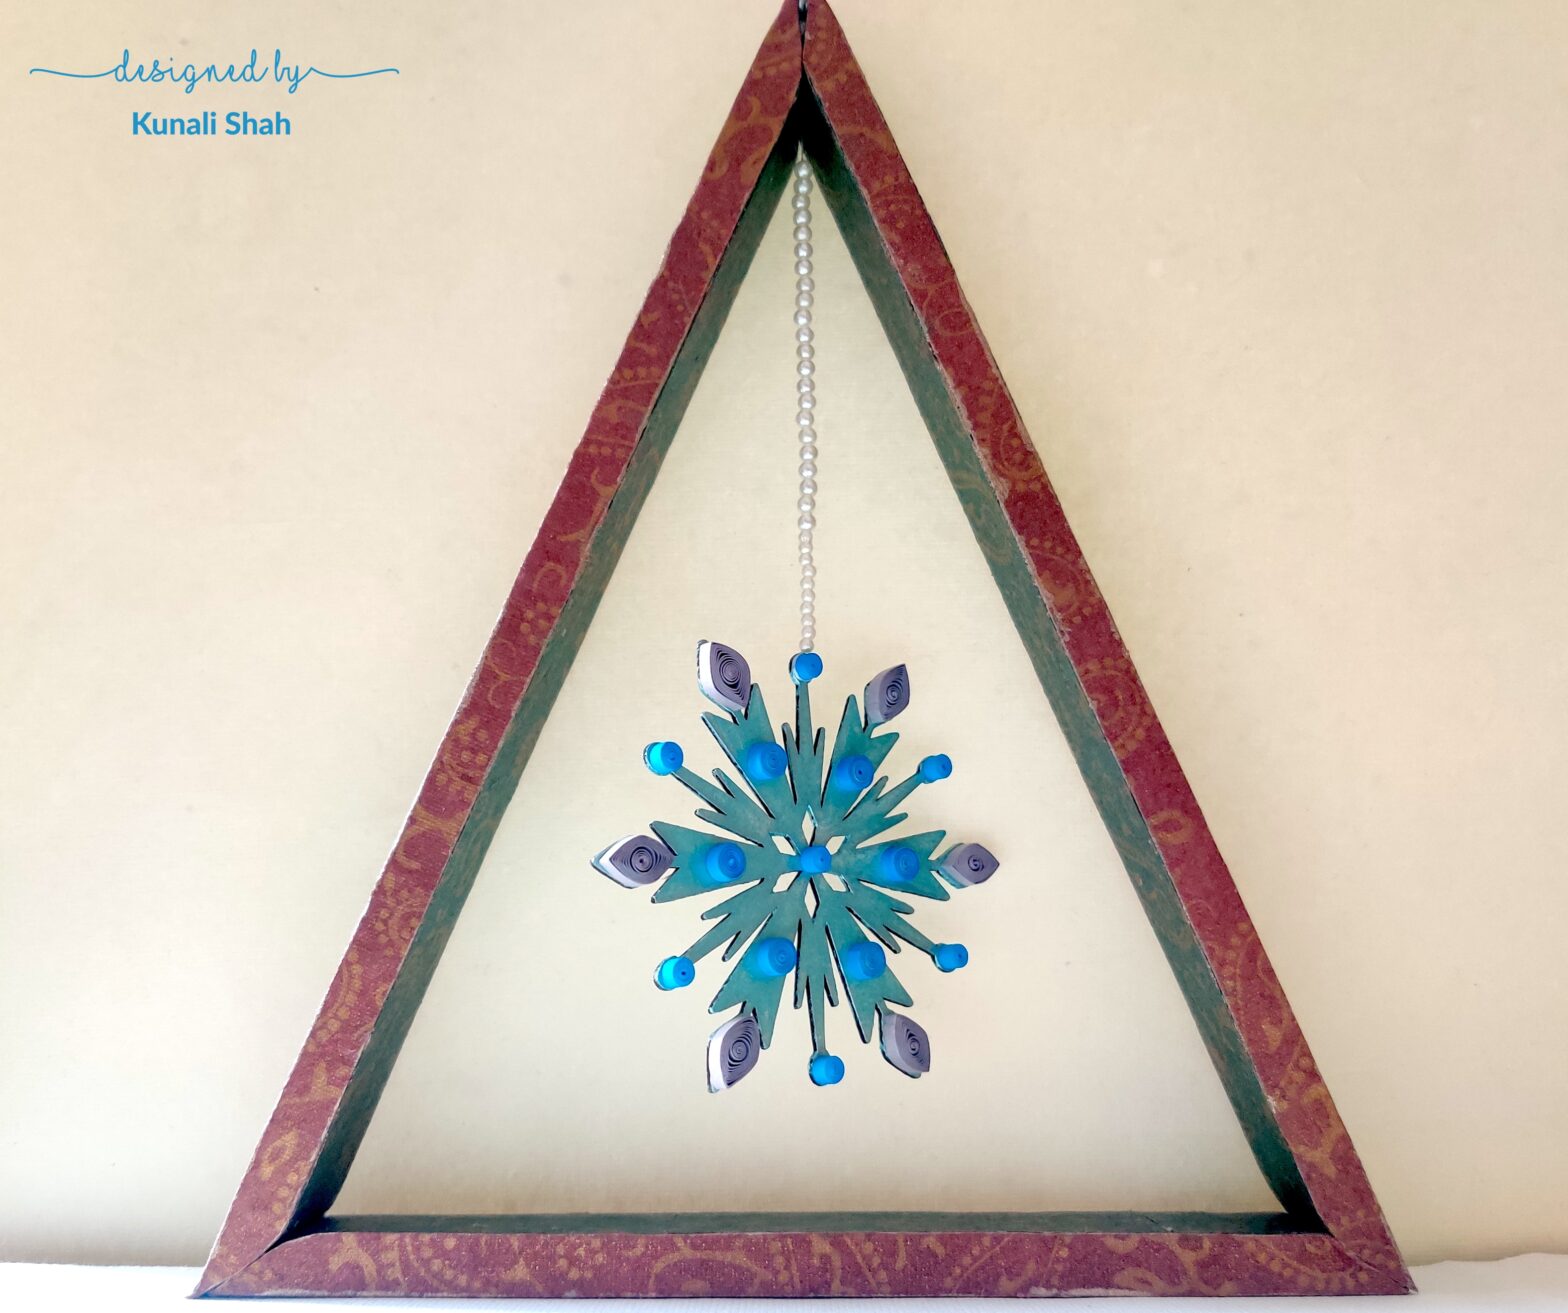
Hi, I’m Kunali and today, I’m going to show you how to make cute snowflake in a Christmas tree home decor art. It’s simple to make and can be created fairly quickly. This could go with your Christmas decor and also work as a great Christmas gift. For starters, I’ve used the same box the snowflake came in.Depending on the thickness of the cardboard, I’ve cut the cardboard into 9 pieces of 1 inch width. 6 of the strips will be 9” in length and 3 of the strips will be 7” in length. Now, Read more…