Hi Friends, it’s Tuesday and we are back with another tutorial here on the Itsy Bitsy Blog. Summer is in full swing and it’s the time of roses. So here we are with a step-by-step tutorial on how to make a beautiful bouquet of roses. These flowers can be made with very limited number of supplies and will brighten up any room!
So let’s get started. Here is the list of supplies we used for making the flowers:
- Duplex paper in your choice of colour
- Floral wire
- Floral Tape
- Green Handmade paper for leaves
- 10-12mm beads
Note: You can also make these roses with crepe paper but you will get better results with Duplex crepe paper. Duplex paper is thicker than the regular crepe paper and has different colour tones on the two sides. This makes the duplex papers one of the most sought after paper to make realistic looking flowers. This paper has anywhere between 25 – 50% stretch making it possible to manipulate parts of it to give more realistic looking shapes to the petals.
Method:
Cut the duplex paper in heart shapes of roughly about 2”-2 ¼ “ dimensions. The hearts need to have somewhat flat base. These hearts will be used to make the petals of the roses
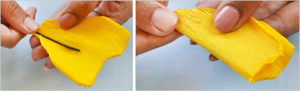 |
| Take one of the hearts and wrap it around the folded floral wire. |
 |
| Twist the paper as shown. This will form the centre of the flower. |
 |
| Tightly wrap some floral tape at the base of the petal to keep it in place. Wrap a second petal in the similar way. |
 |
| Keep adding more petals and wrap the base with floral tape. |
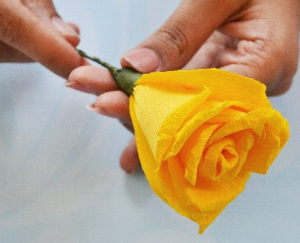 |
| After about 8-9 petals, your flower will look just like a rose bloom. Make as many roses you would like for your bouquet. |
 |
| Thread a bead onto one end of a floral wire and fold back the end ( about ½ “) as shown. |
 |
| Wrap the bead completely with floral tape. This will make the rose buds. |
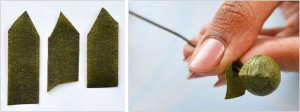 |
| Cut 3 pieces of floral tape in the shape shown here. Line them at the base of the bud to simulate sepals. |
 |
| Tightly wrap some floral tape to keep the sepals in place. The rose bud is ready! |
 |
| Cut some leaf shapes with the green handmade paper and wrap them about an inch below the base of the flowers using floral tape. |
You can add leaves in this way to all the flowers or just some of them depending on how much foliage you want in your bouquet.
 |
| Start assembling the flower bunches by arranging them in a staggered fashion and twisting the stems together. |
 |
| Wrap the stems with more floral tape. |
 |
| Your rose bunch is ready! Make as many such bunches as you want and in as many colours as you want. |
As you can see in the picture below, we made them in different colours and they looked so beautiful together that we did not have the heart to segregate them by colours!
The last but not the least step – Sit back and enjoy the beautiful roses! 🙂
Hope this tutorial has inspired you to try it out. Do leave your feedback in the comments below and send us pictures on our Facebook page if you try it.
Here’s a handy link for the supplies.
Link for Supplies:
Duplex paper:
Floral Tape:
Floral Wire:
Handmade Paper:


Beautiful
Thank you 🙂
Nice
Nice
Thanks 🙂
amazing idea i will try it soon
argan oil bulk
Great posting…!!!
online Flower
V beautiful
Nice