Hello everyone. First of all I want to wish you all A Very Happy New Year. DT member Vidhu Thareja back on the blog today with a new inspirational project. This year has brought new hopes, new beginning for all of us. So why not we all start this year with learning something interesting and exciting.
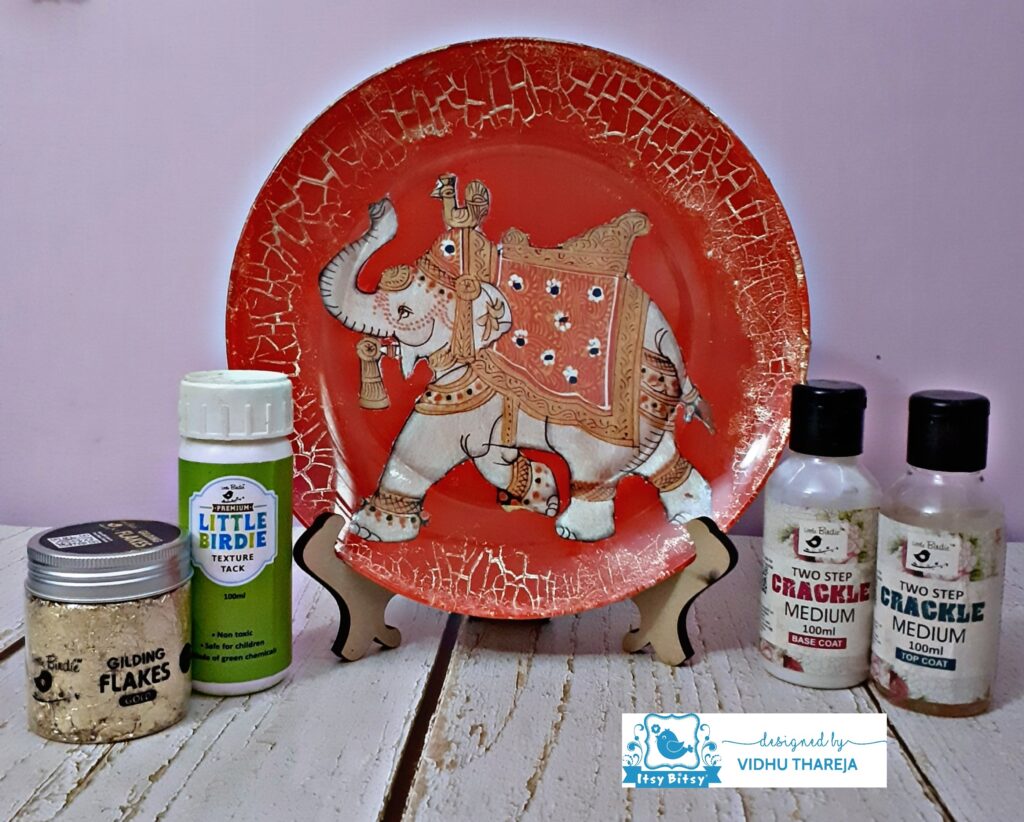
As you all are aware, the ongoing blog challenge #33 is ‘Decoupage Challenge’. So I have designed a reverse decoupage project using some awesome craft supplies from the store.
We all know that decoupage is the art of decorating any object by gluing colored paper or decorative napkin pieces onto it. Decoupage can be done on all type of surfaces like MDF, Wood, Metal, Ceramic, Glass, so the possibilities are endless. Now, decoupage is not limited to simply gluing the paper or napkin, other techniques like colour blending, special paint effect, gilding, distressing, stenciling, stamping, crackle effects are combined with it to make it more attractive and presentable.
In my new project I have combined crackle effect and gilding technique with reverse decoupage. I have a step wise picture tutorial for you all but before starting the tutorial have a look on my project…Since I wanted to do reverse decoupage, I took a clear glass plate, measuring 9.5
 “. You can buy clear glass plates at the Itsy Bitsy stores in your city or use any clear glass plate. I cleaned the plate with rubbing alcohol to get rid of any dust particles or finger impressions. I decided to use one of the beautiful designs – ‘Ornate Elephant’ from the collection of Filament Decoupage Papers. 60gsm makes this paper perfect for this type of project because it gives the feel of rice paper and blends very easily with the base and color. You can use decoupage napkin too!
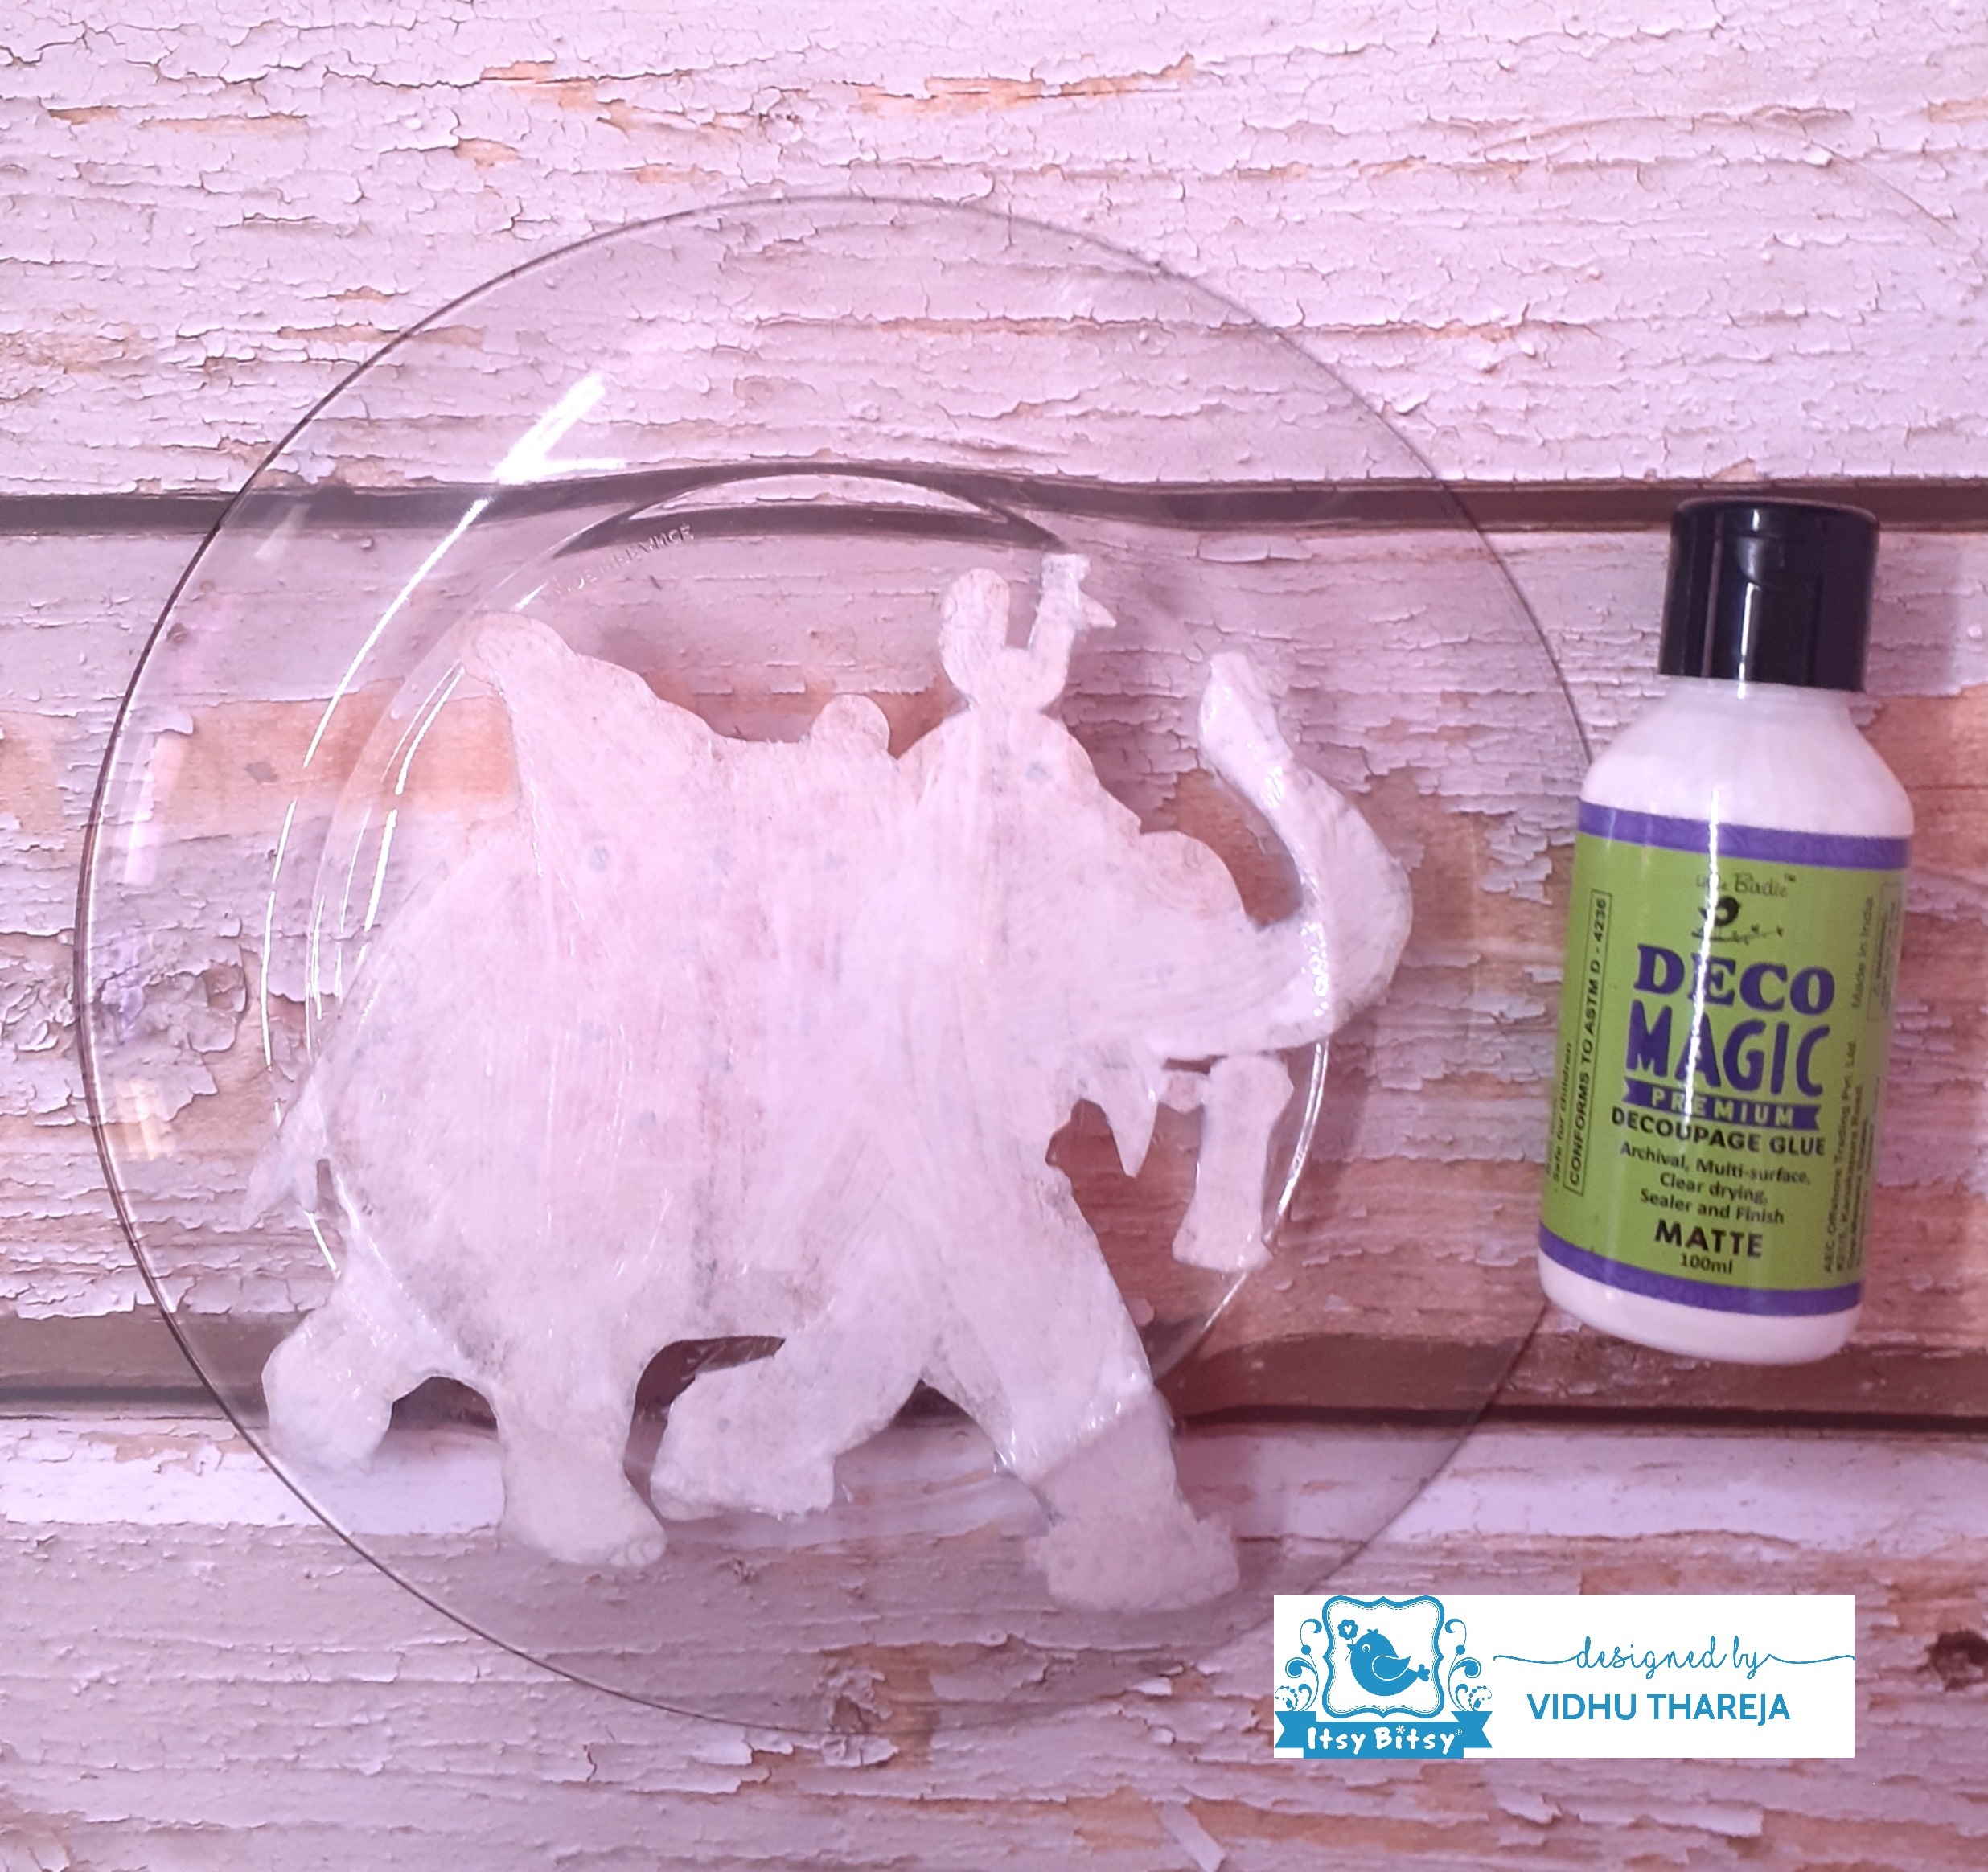
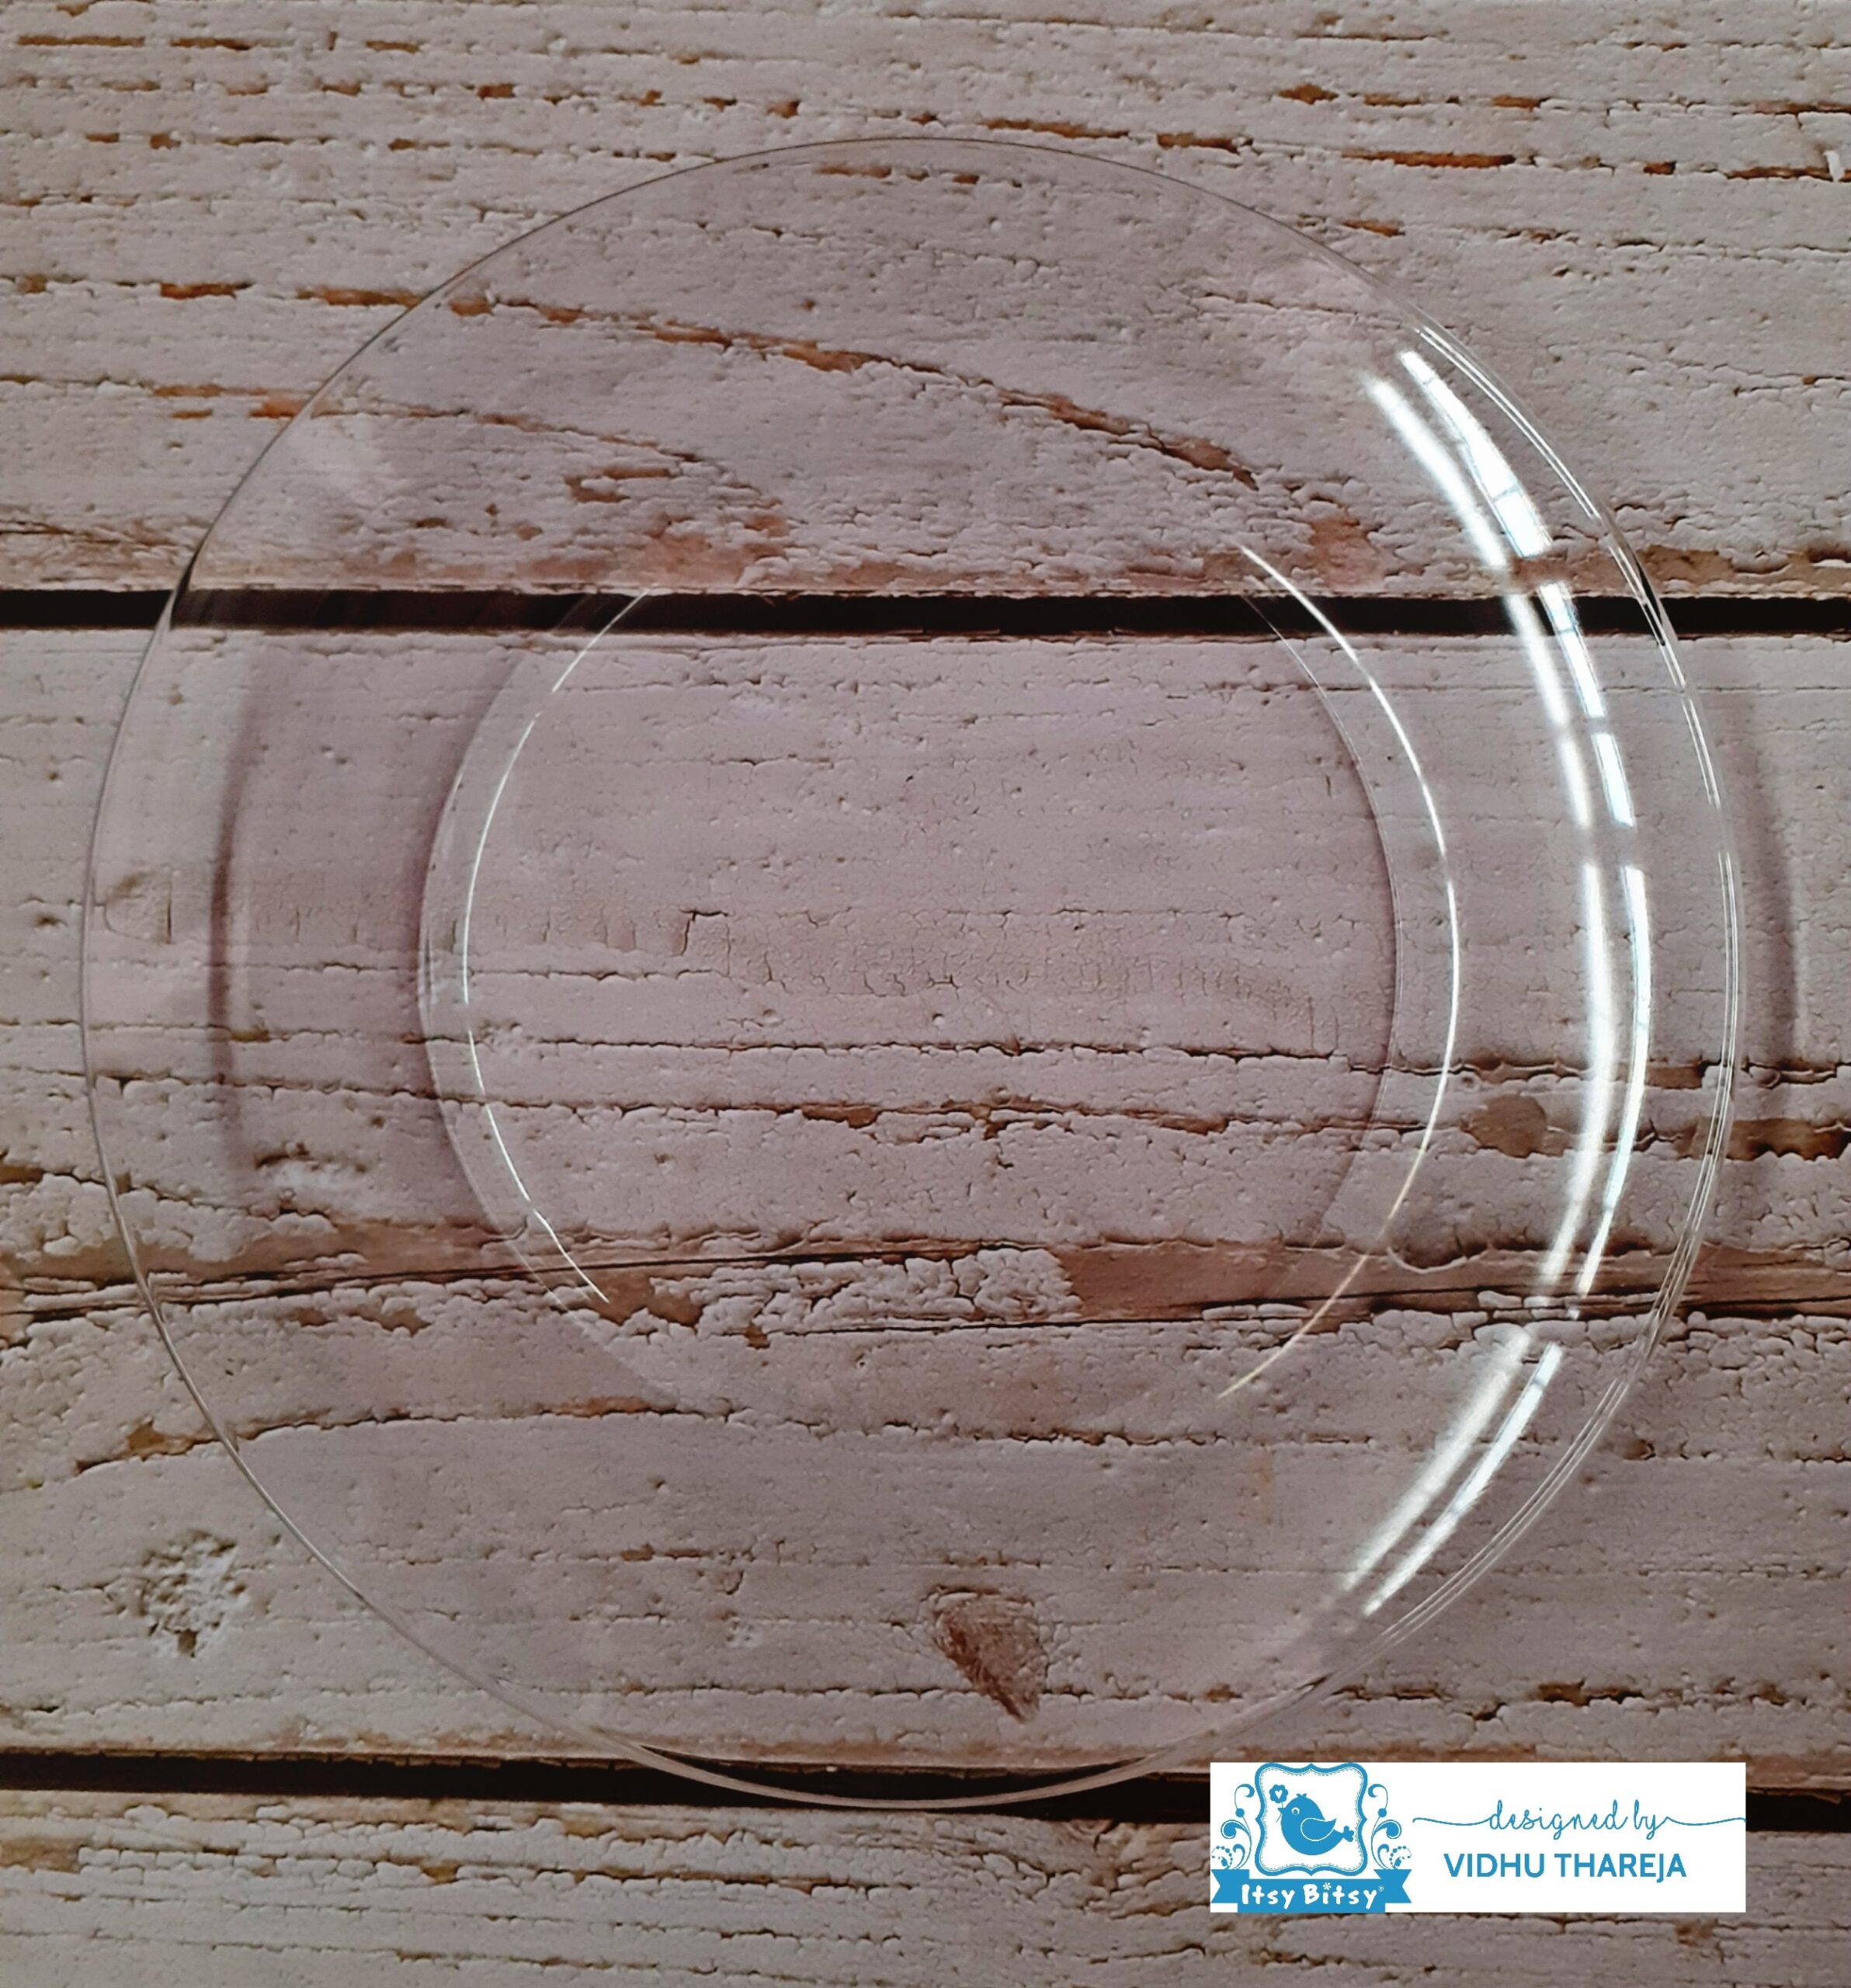 I have fussy cut the image and adhered it facedown on the reverse side of the plate using Little Birdie Deco Magic glue – Matte. Applied a thin even layer of glue, which was sufficient. If the glue dries in certain areas before you adhere the image, you will see visible strokes of glue so make sure that glue is wet in all areas as you adhere the image. Do not adhere the whole image in one go. Start from one end by applying glue on a small area. Adhere the image and press it to remove air bubbles. Adhere the image like this and after adhering the whole image, place any plastic sheet and press gently from inward to outward direction to get a wrinkle free finish. Leave it to dry.
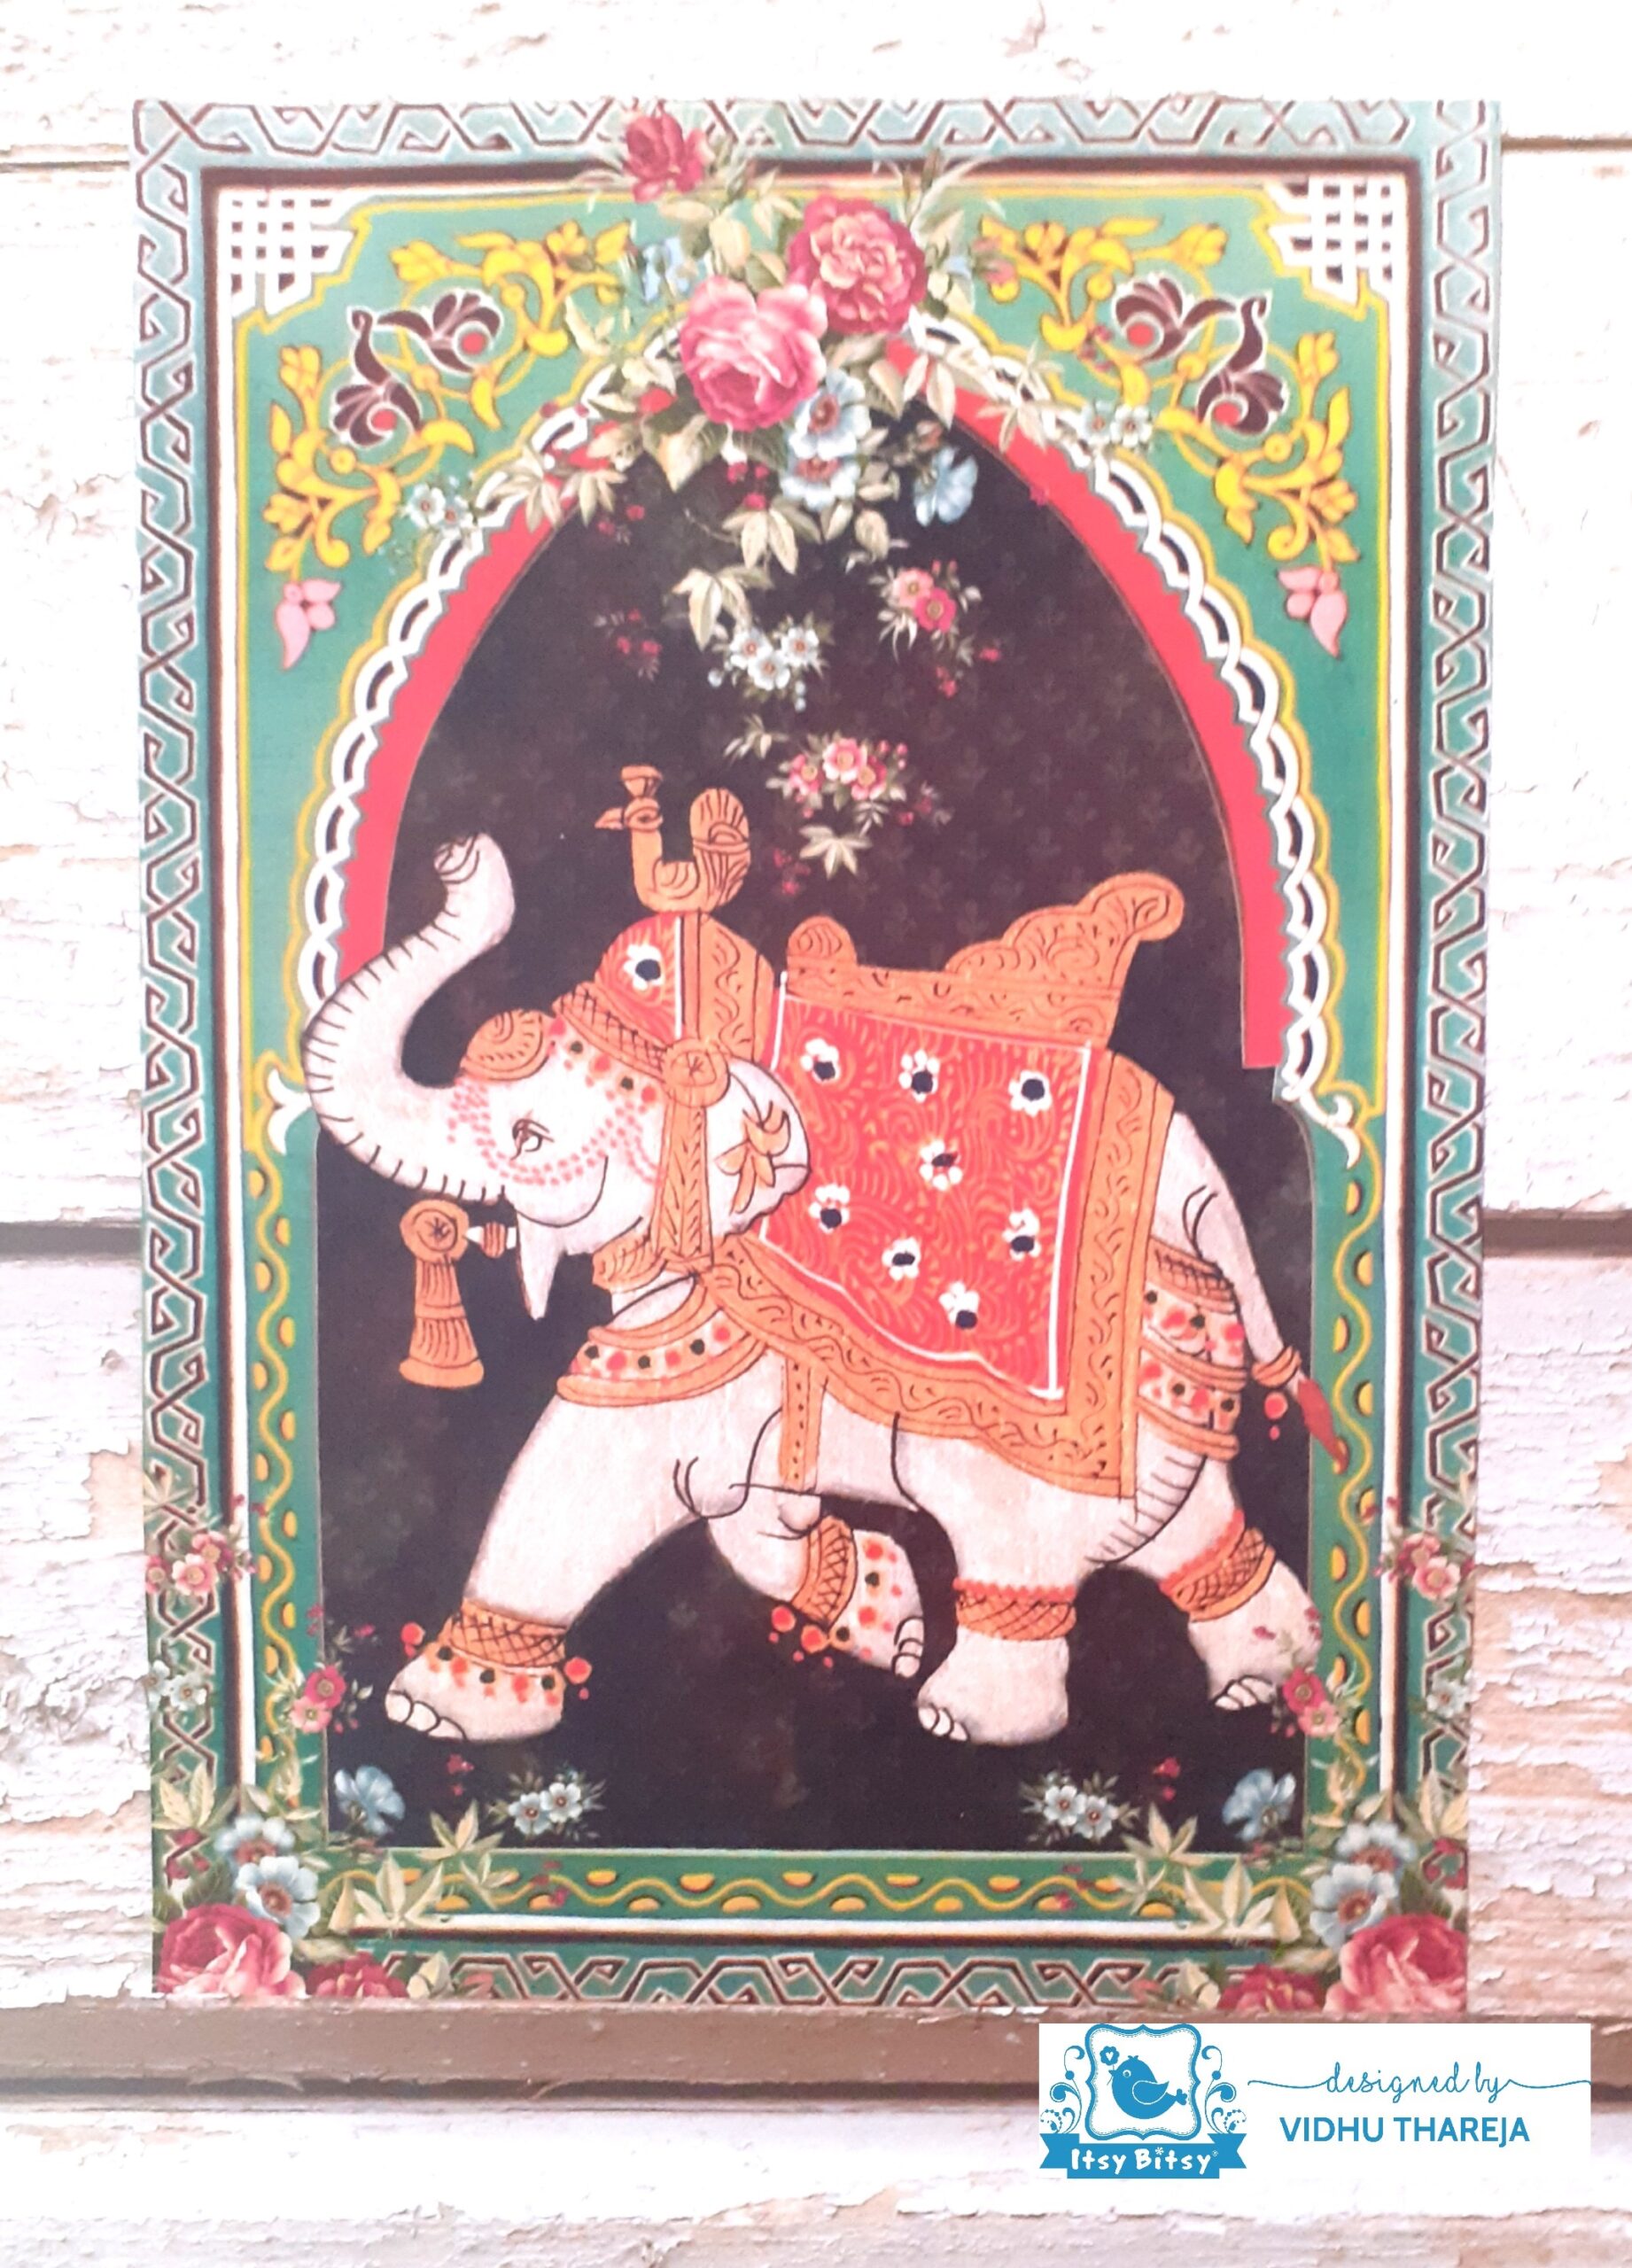

On the sides I wanted to do gilding but instead of doing it directly I decided to give a crackle effect first and for that I have used Little Birdie 2 Step Crackle Medium. This medium works well on every type of base except fabric. 2 step crackle medium involves two steps- base coat and top coat. First I applied a base coat of crackle medium using the dabbing method. 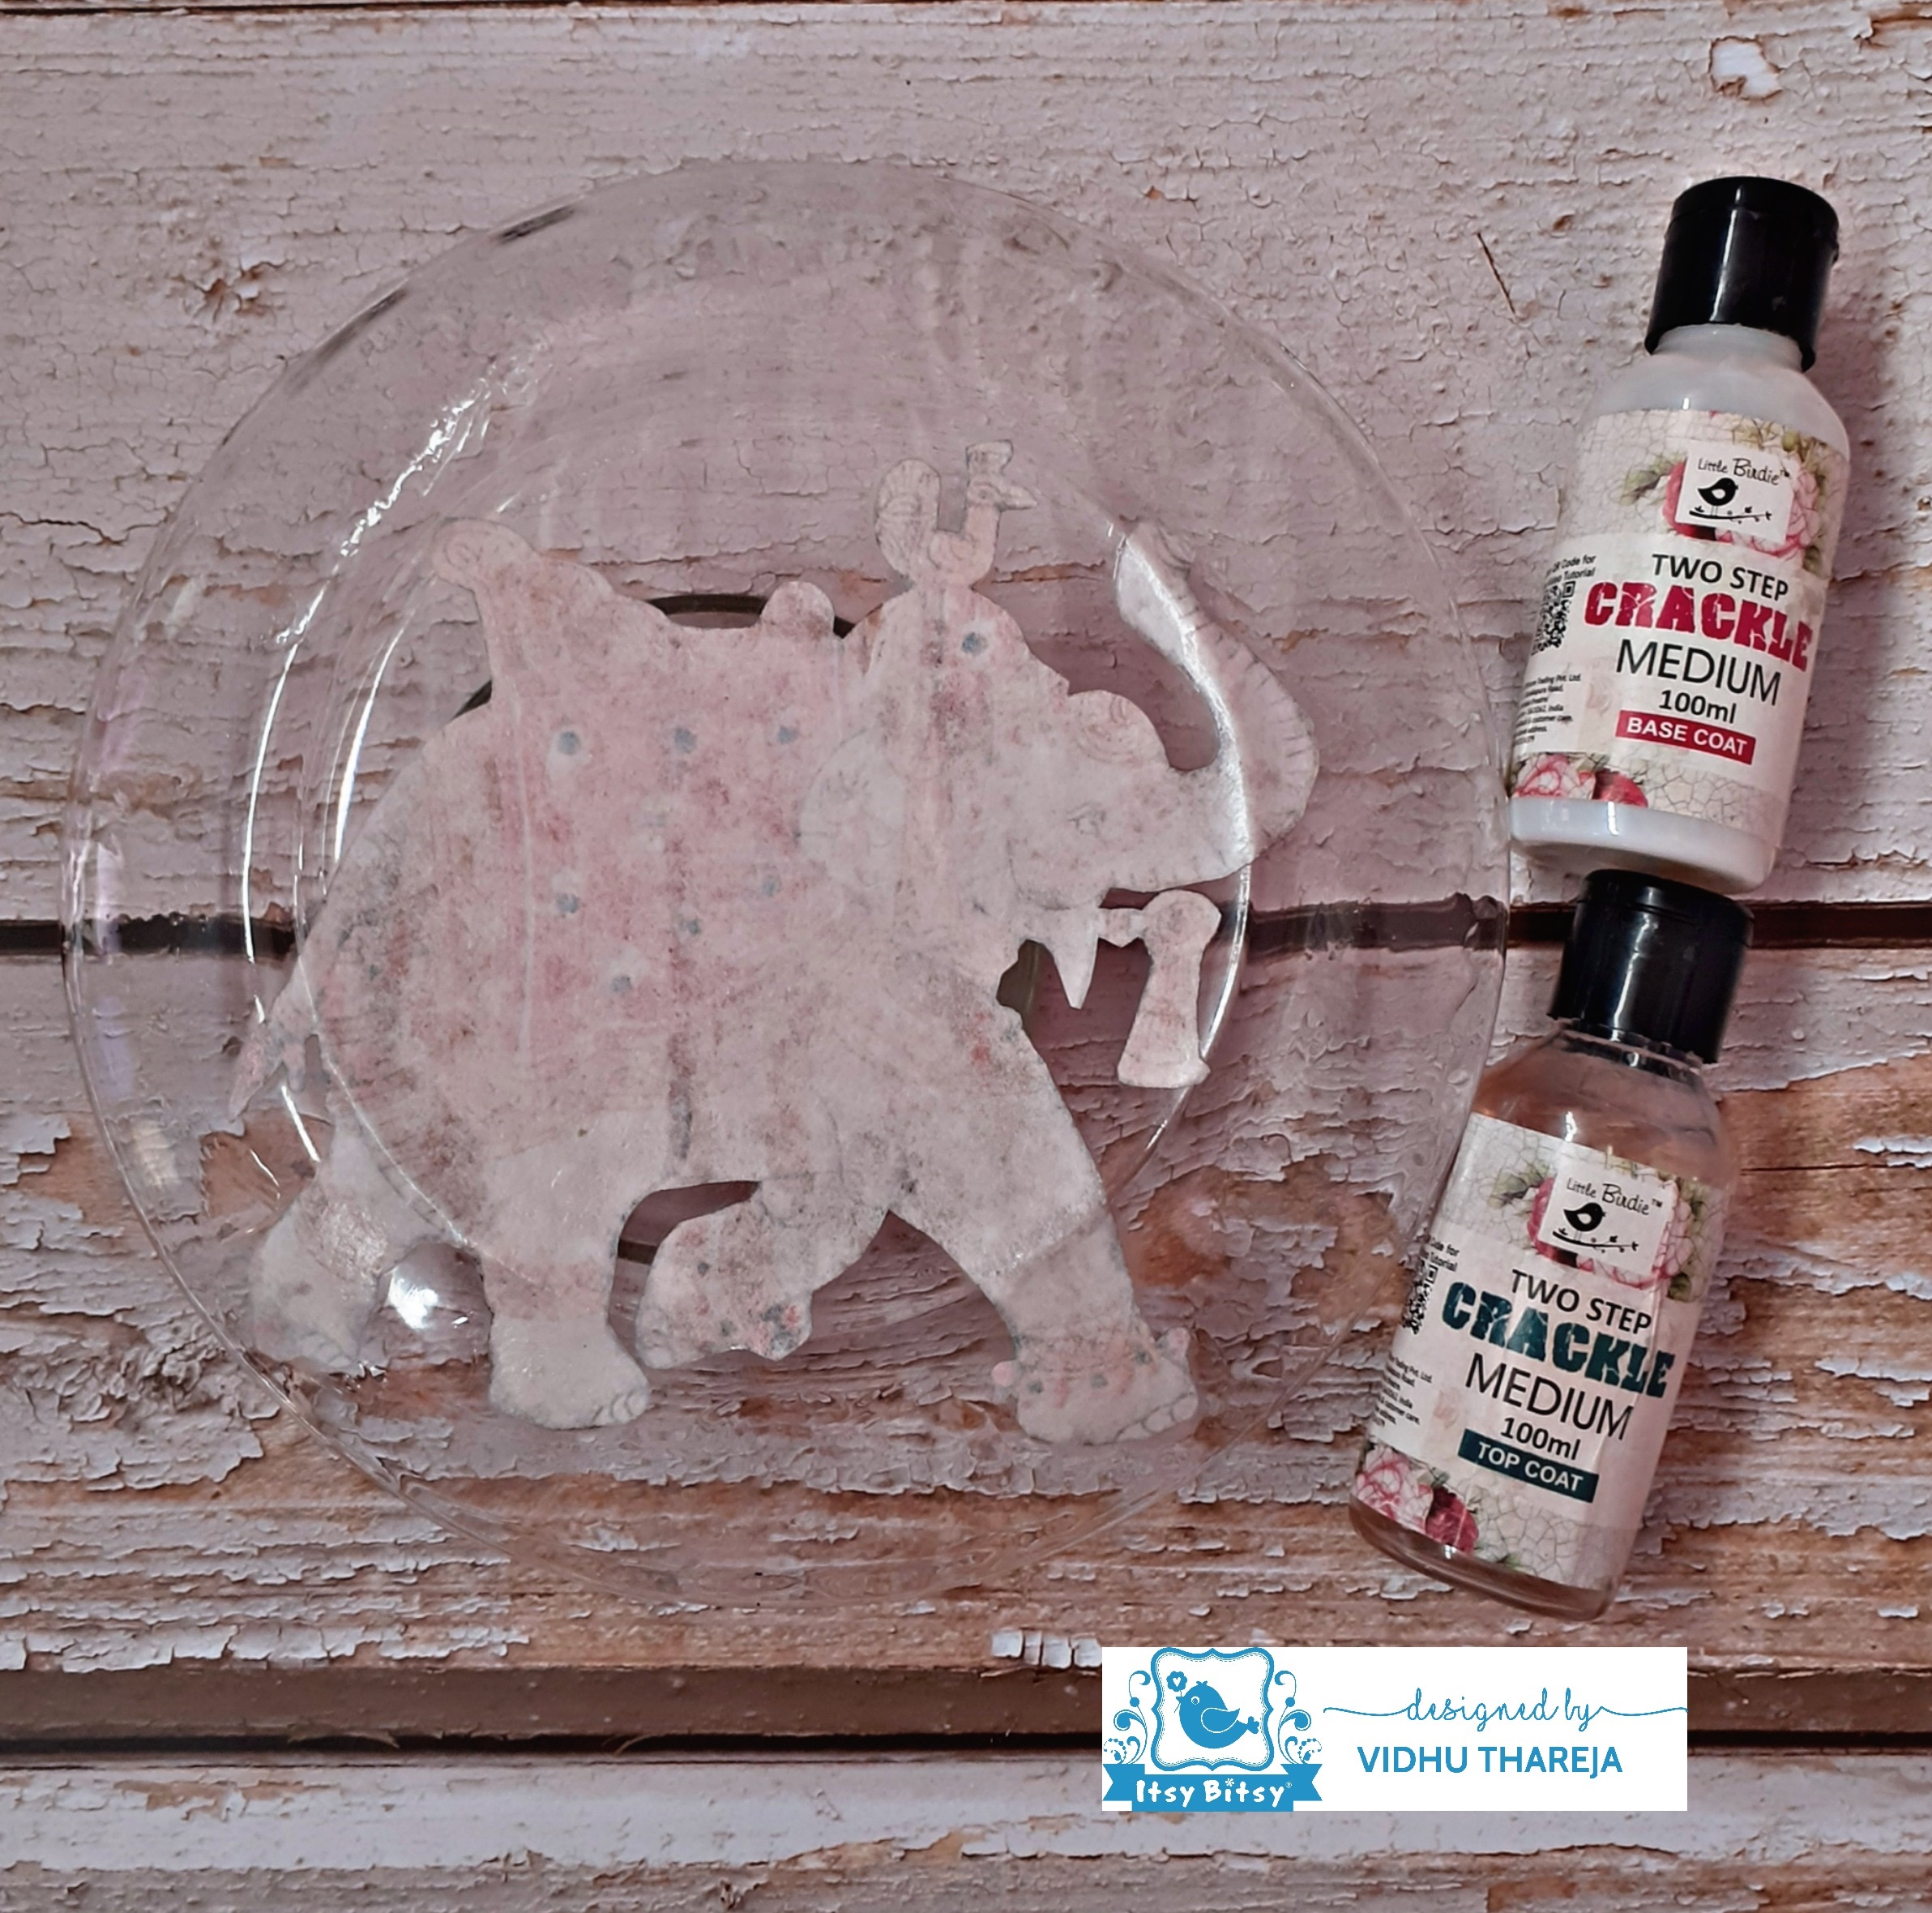 Use a synthetic brush to apply crackle medium. On MDF we should apply crackle medium in a horizontal or vertical direction but on a glass plate, we must apply in a circular direction. I have applied crackle medium in a clockwise direction. I leave it to dry naturally. It takes a few hours to dry. The base coat looks milky but it dries clear. It remains a little tacky after drying.
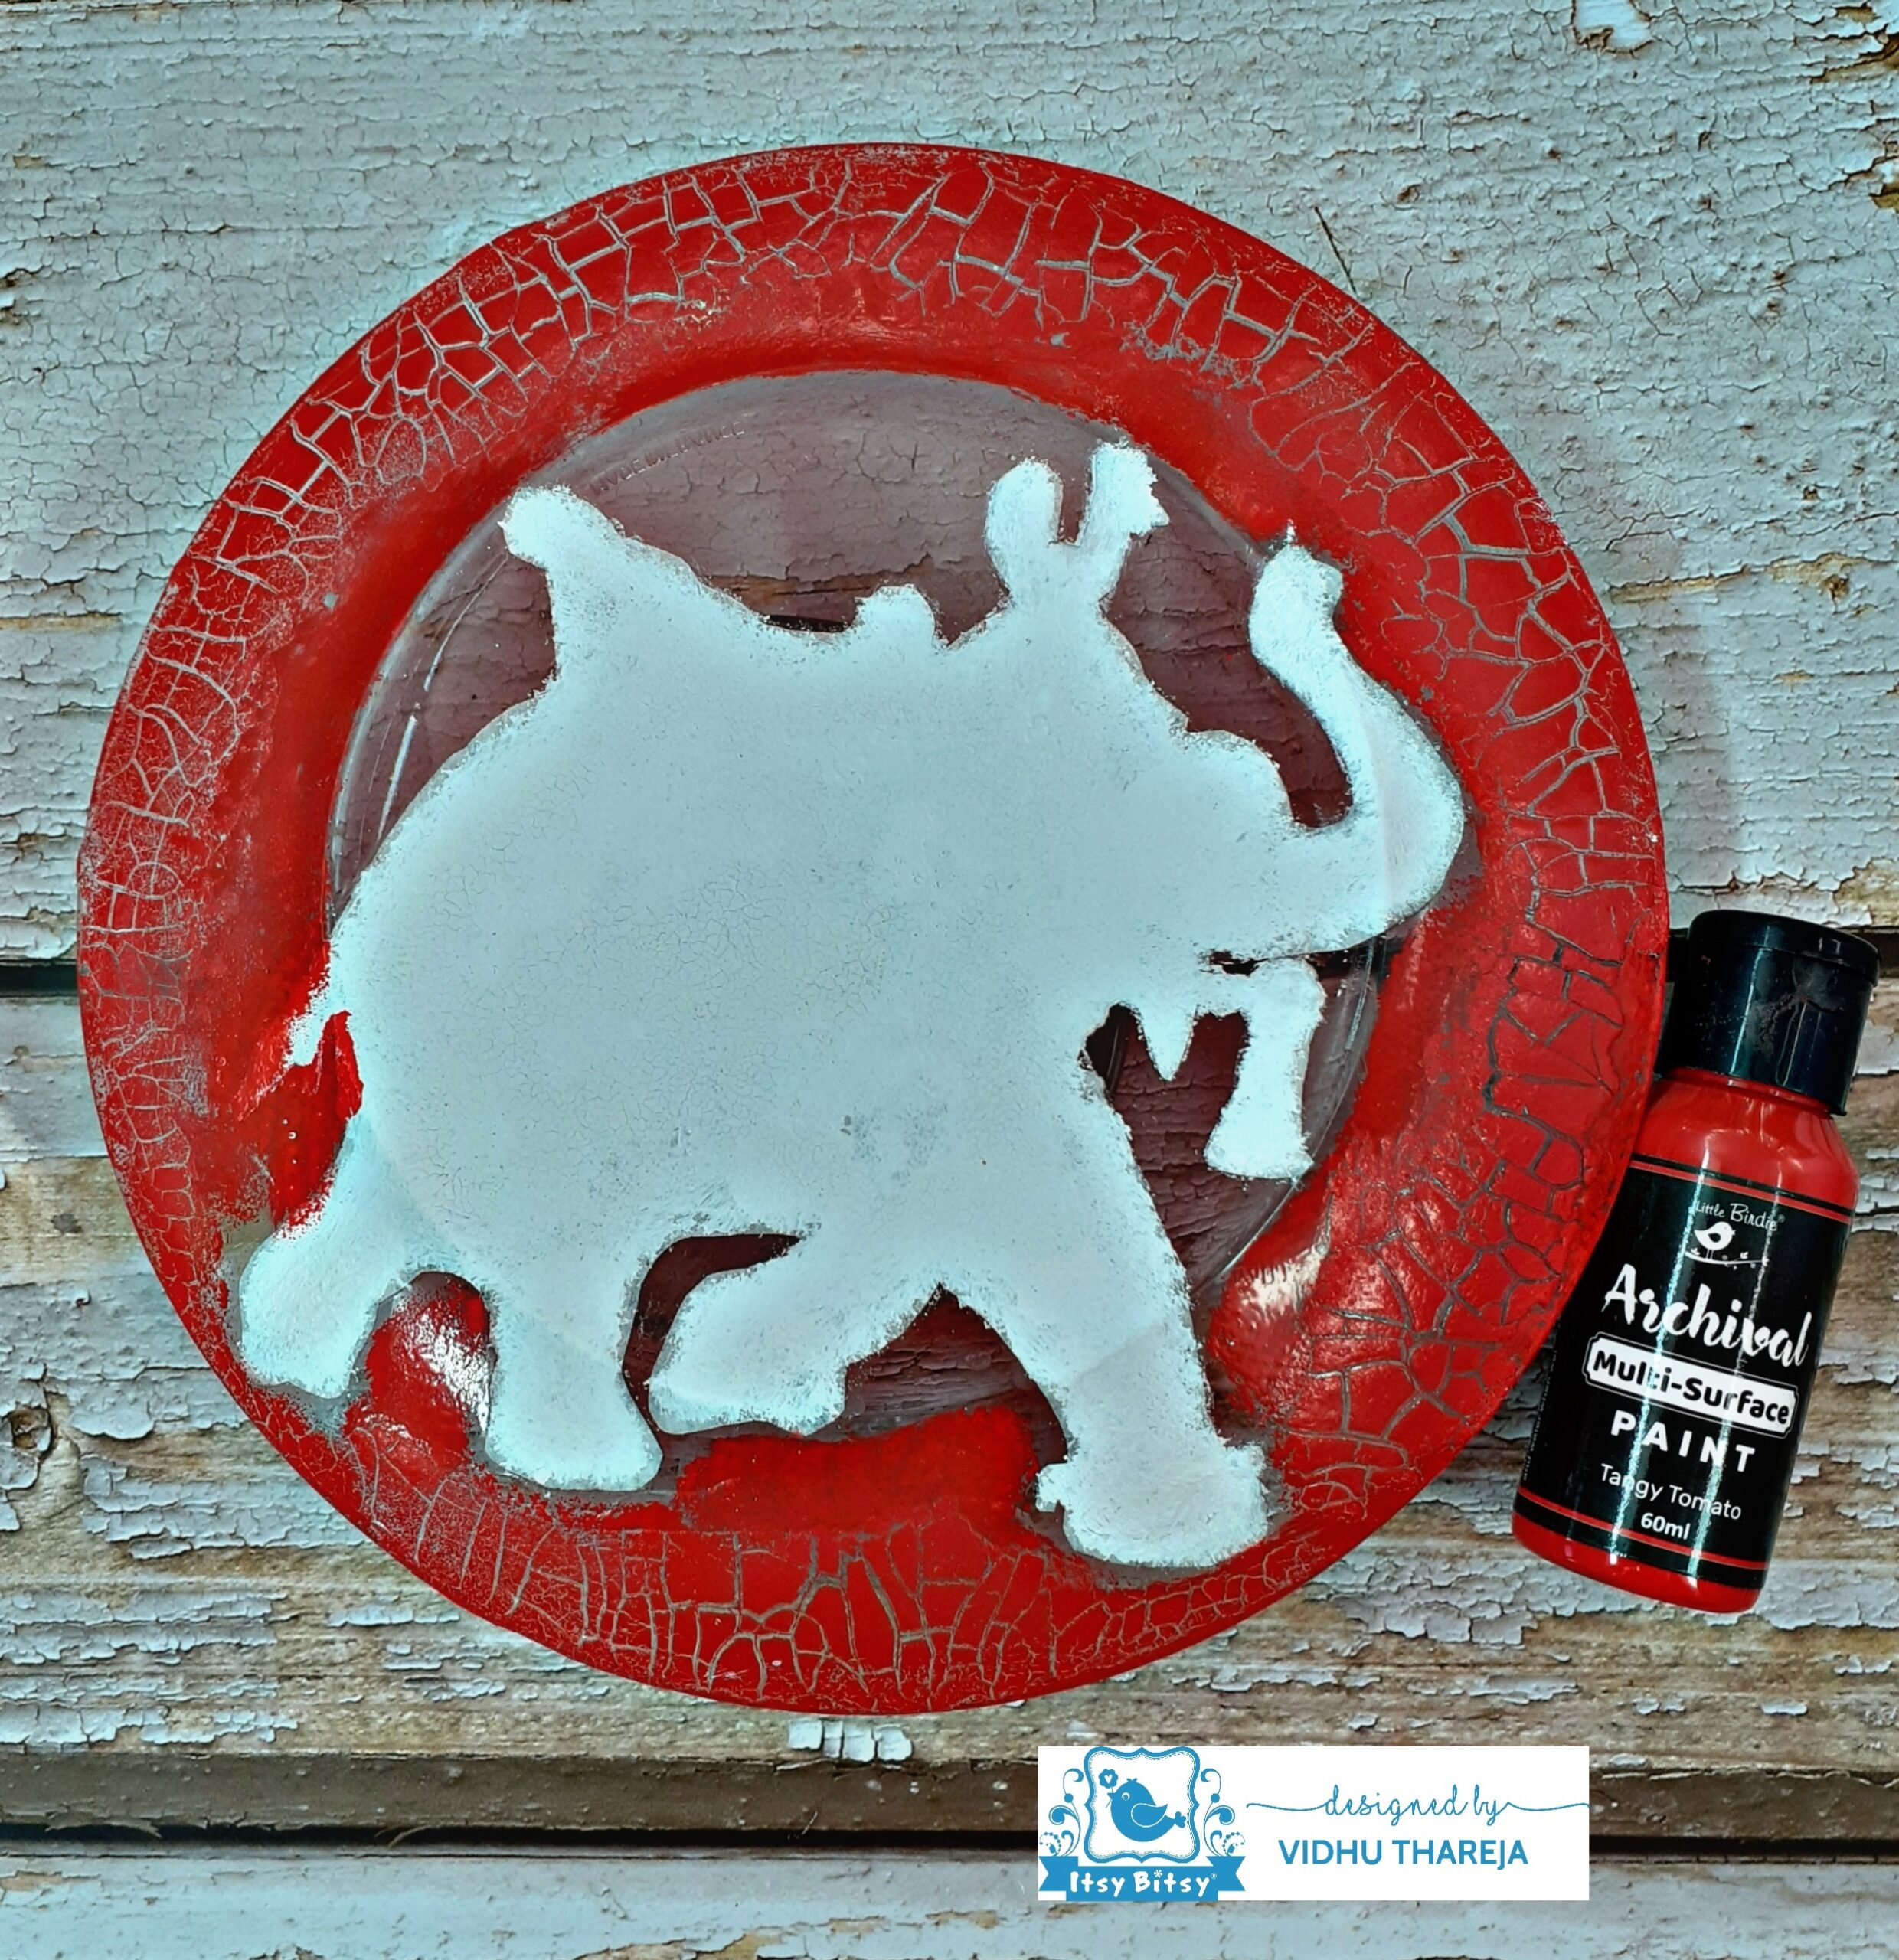
Now it is the turn to apply the top coat of crackle medium. I applied a thick layer as a top coat in the same direction, in which I had applied the base coat. Formation of cracks depends on the thickness of the top coat, so if you want bigger cracks apply a thicker coat of top coat and leave it to dry naturally. Meanwhile I applied Little Birdie Chalk Paint – Snow on top of the adhered image.
Tip: Do not over- stroke the medium and use dabbing method to apply crackle medium. Always leave crackle medium to dry naturally for best results. Do not use heat tool to speed up the drying. Drying time depends on the room temperature and weather. The top coat of the crackle medium takes more time to dry, compared to base coat… so be patient here.
Now it was turn to highlight the cracks. For this purpose I have used Little Birdie Archival Multi-Surface Paint – Tangy Tomato, which works very well on glass surfaces and gives excellent coverage. I applied it with the help of sponge, first on top of the cracks and then continued to apply colour on the rest of the plate. Do not over-stroke the color because it will suppress the beauty of the cracks. As soon as the paint starts drying, beautiful cracks starts to show. 
Getting desired crackled results always makes me happy!
Tip : Acrylic colors do not work well on glass or metal surface. It will start peeling off as soon you start sealing your project. I would recommend multi-surface paints or chalk paints for the purpose.
Now I need to fill the cracks. Instead of using color, I decided to do gilding for a rich look. Here I have used 2 excellent products from the store – Little Birdie – Texture Tack and Gilding Flakes. Little Birdie Gilding Glue is also available at the store. You can use that also. I like the consistency of the Texture Tack. I applied it on top of the cracks with the help of a synthetic brush. It looks milky but becomes transparent or clear after a few minutes and remains tacky. I left it for sometime till it became tacky.
 I took Little Birdie Gilding Flakes – Gold and spread them on top of the areas where I had applied Texture Tack. Then I used a soft flat brush and pressed them so that all the flakes stuck to the tacky tack. I brushed off the extra gold flakes. I left it to dry. Gilding Flakes are available in silver too!
 There is no need to seal the gold flakes but you can seal it with varnish if you wish to.
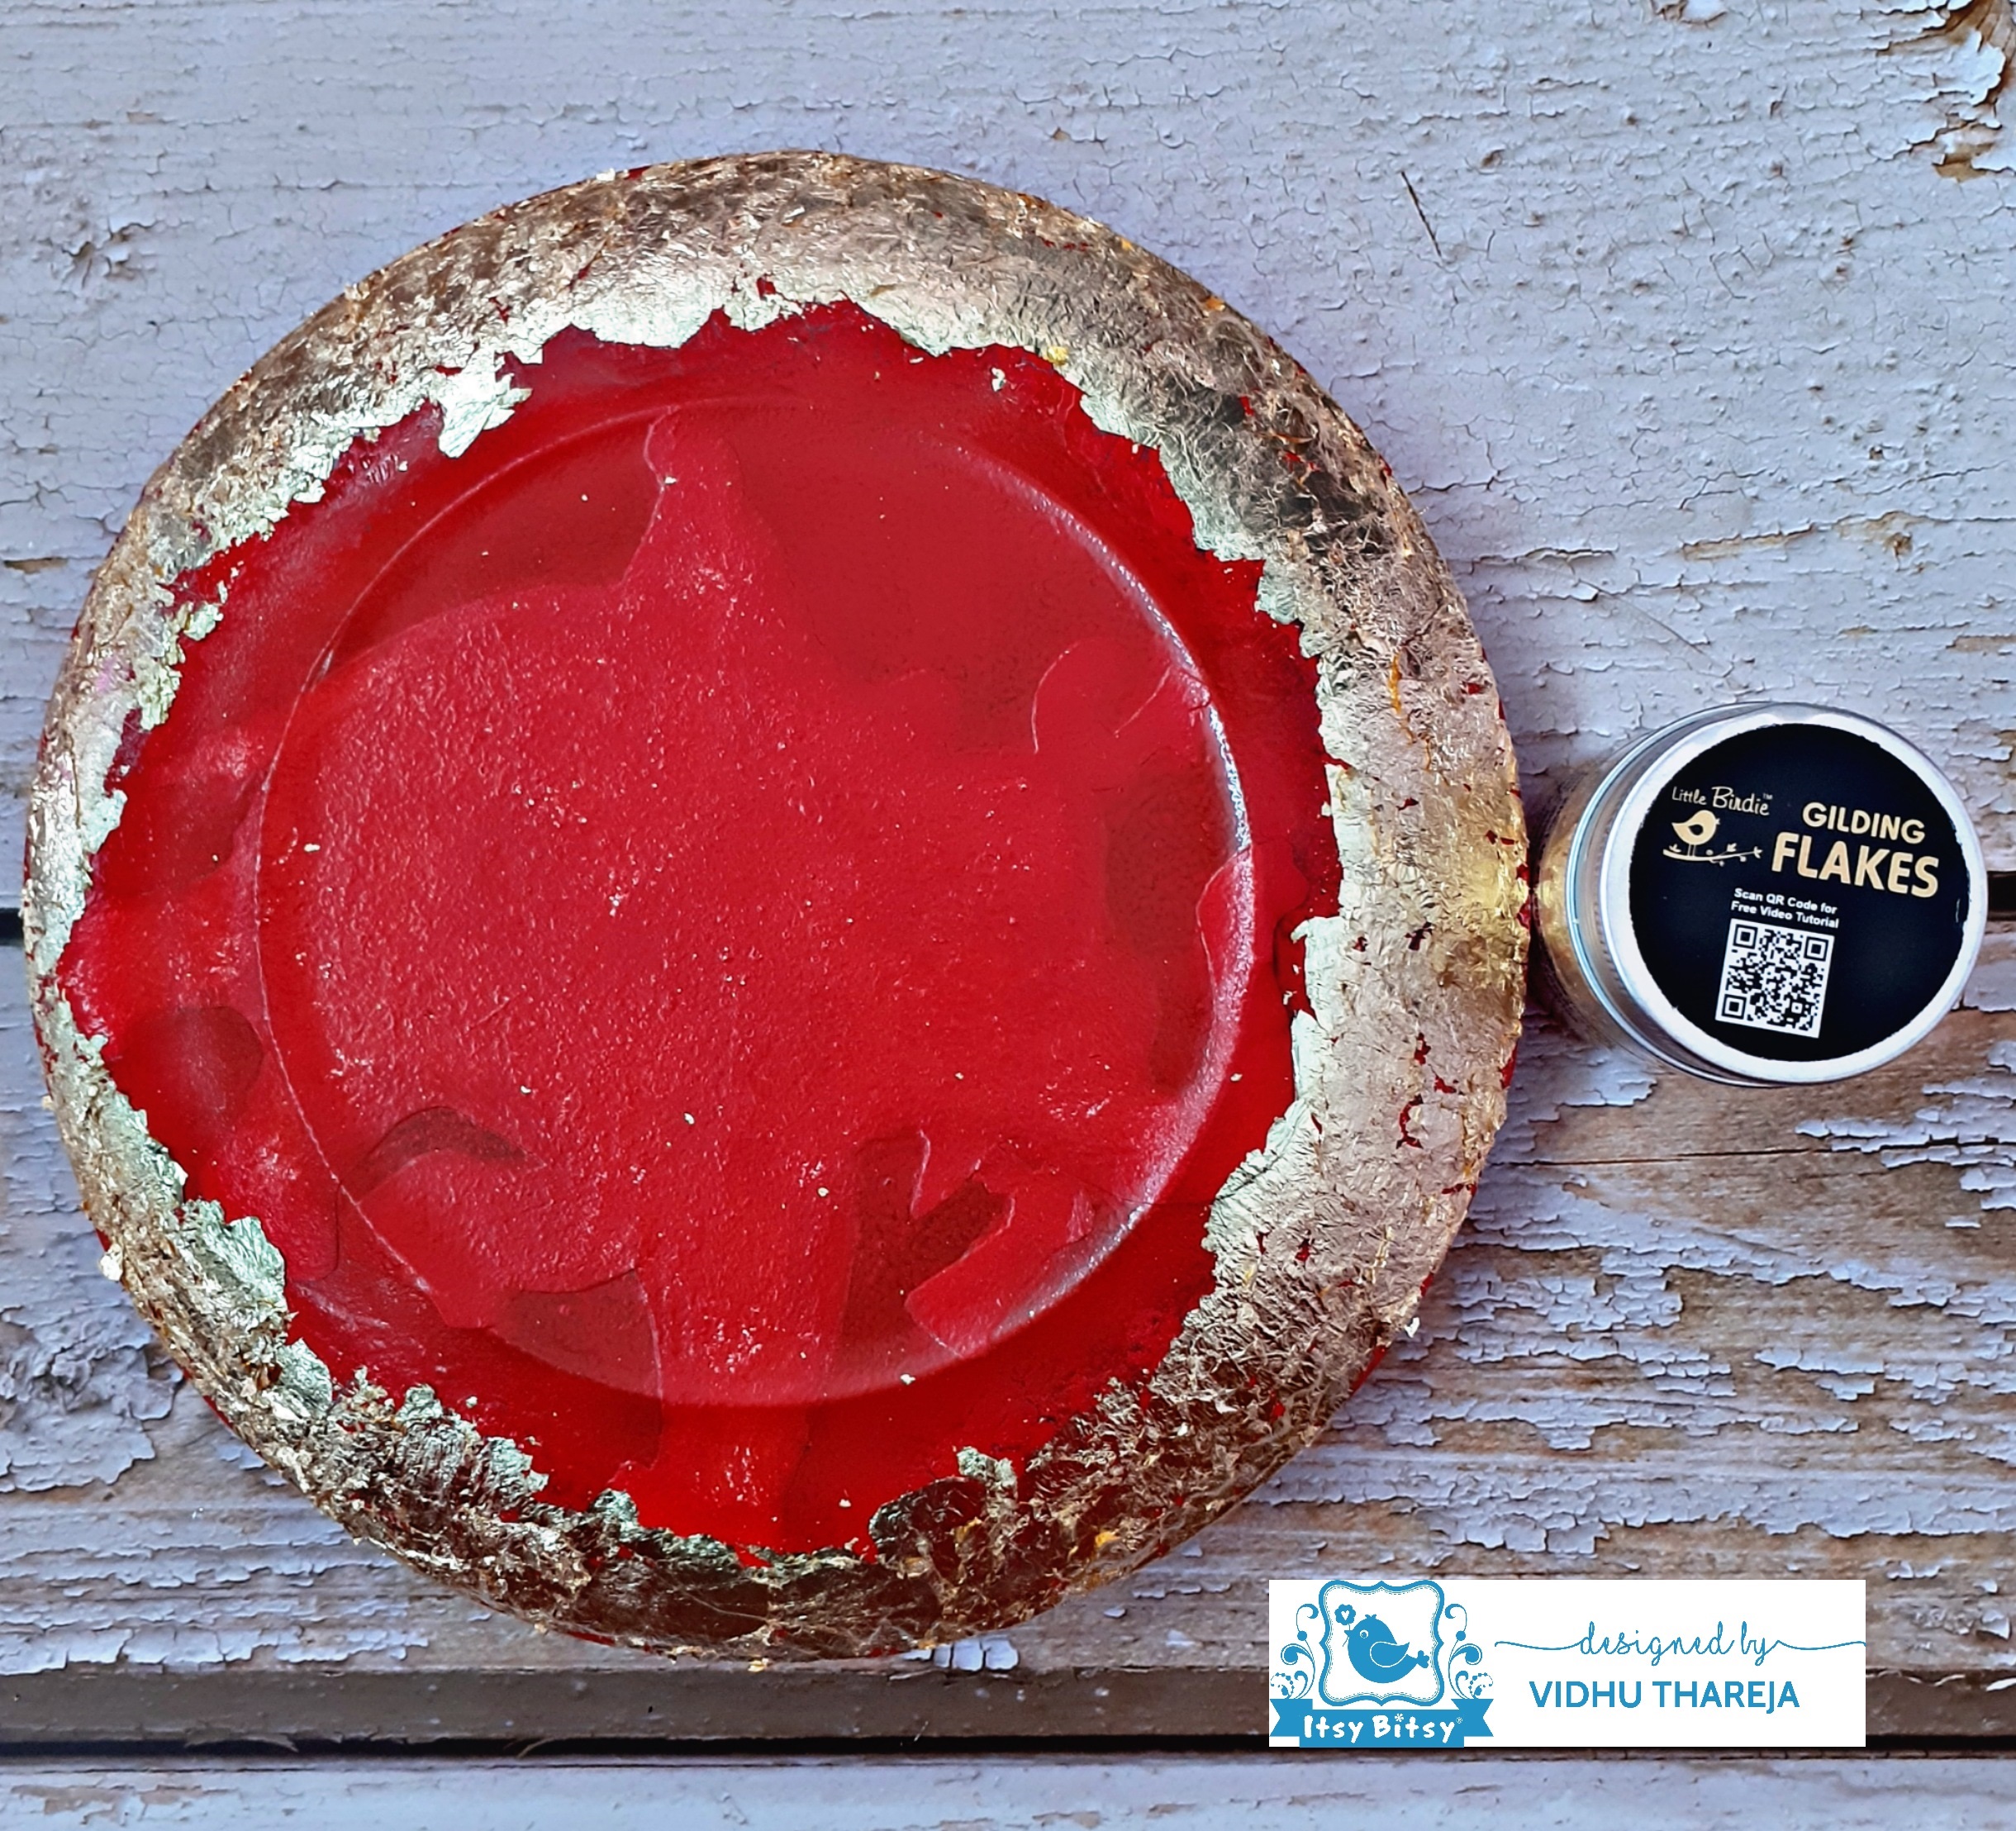
I like a neat finish at the back of the project too. Therefore I applied two coats of Artists Acrylic Colour – Antique Gold with a sponge to give it a uniform finish and then rubbed metallic wax – Antique Gold on the outer edge of the plate. I left it to dry completely.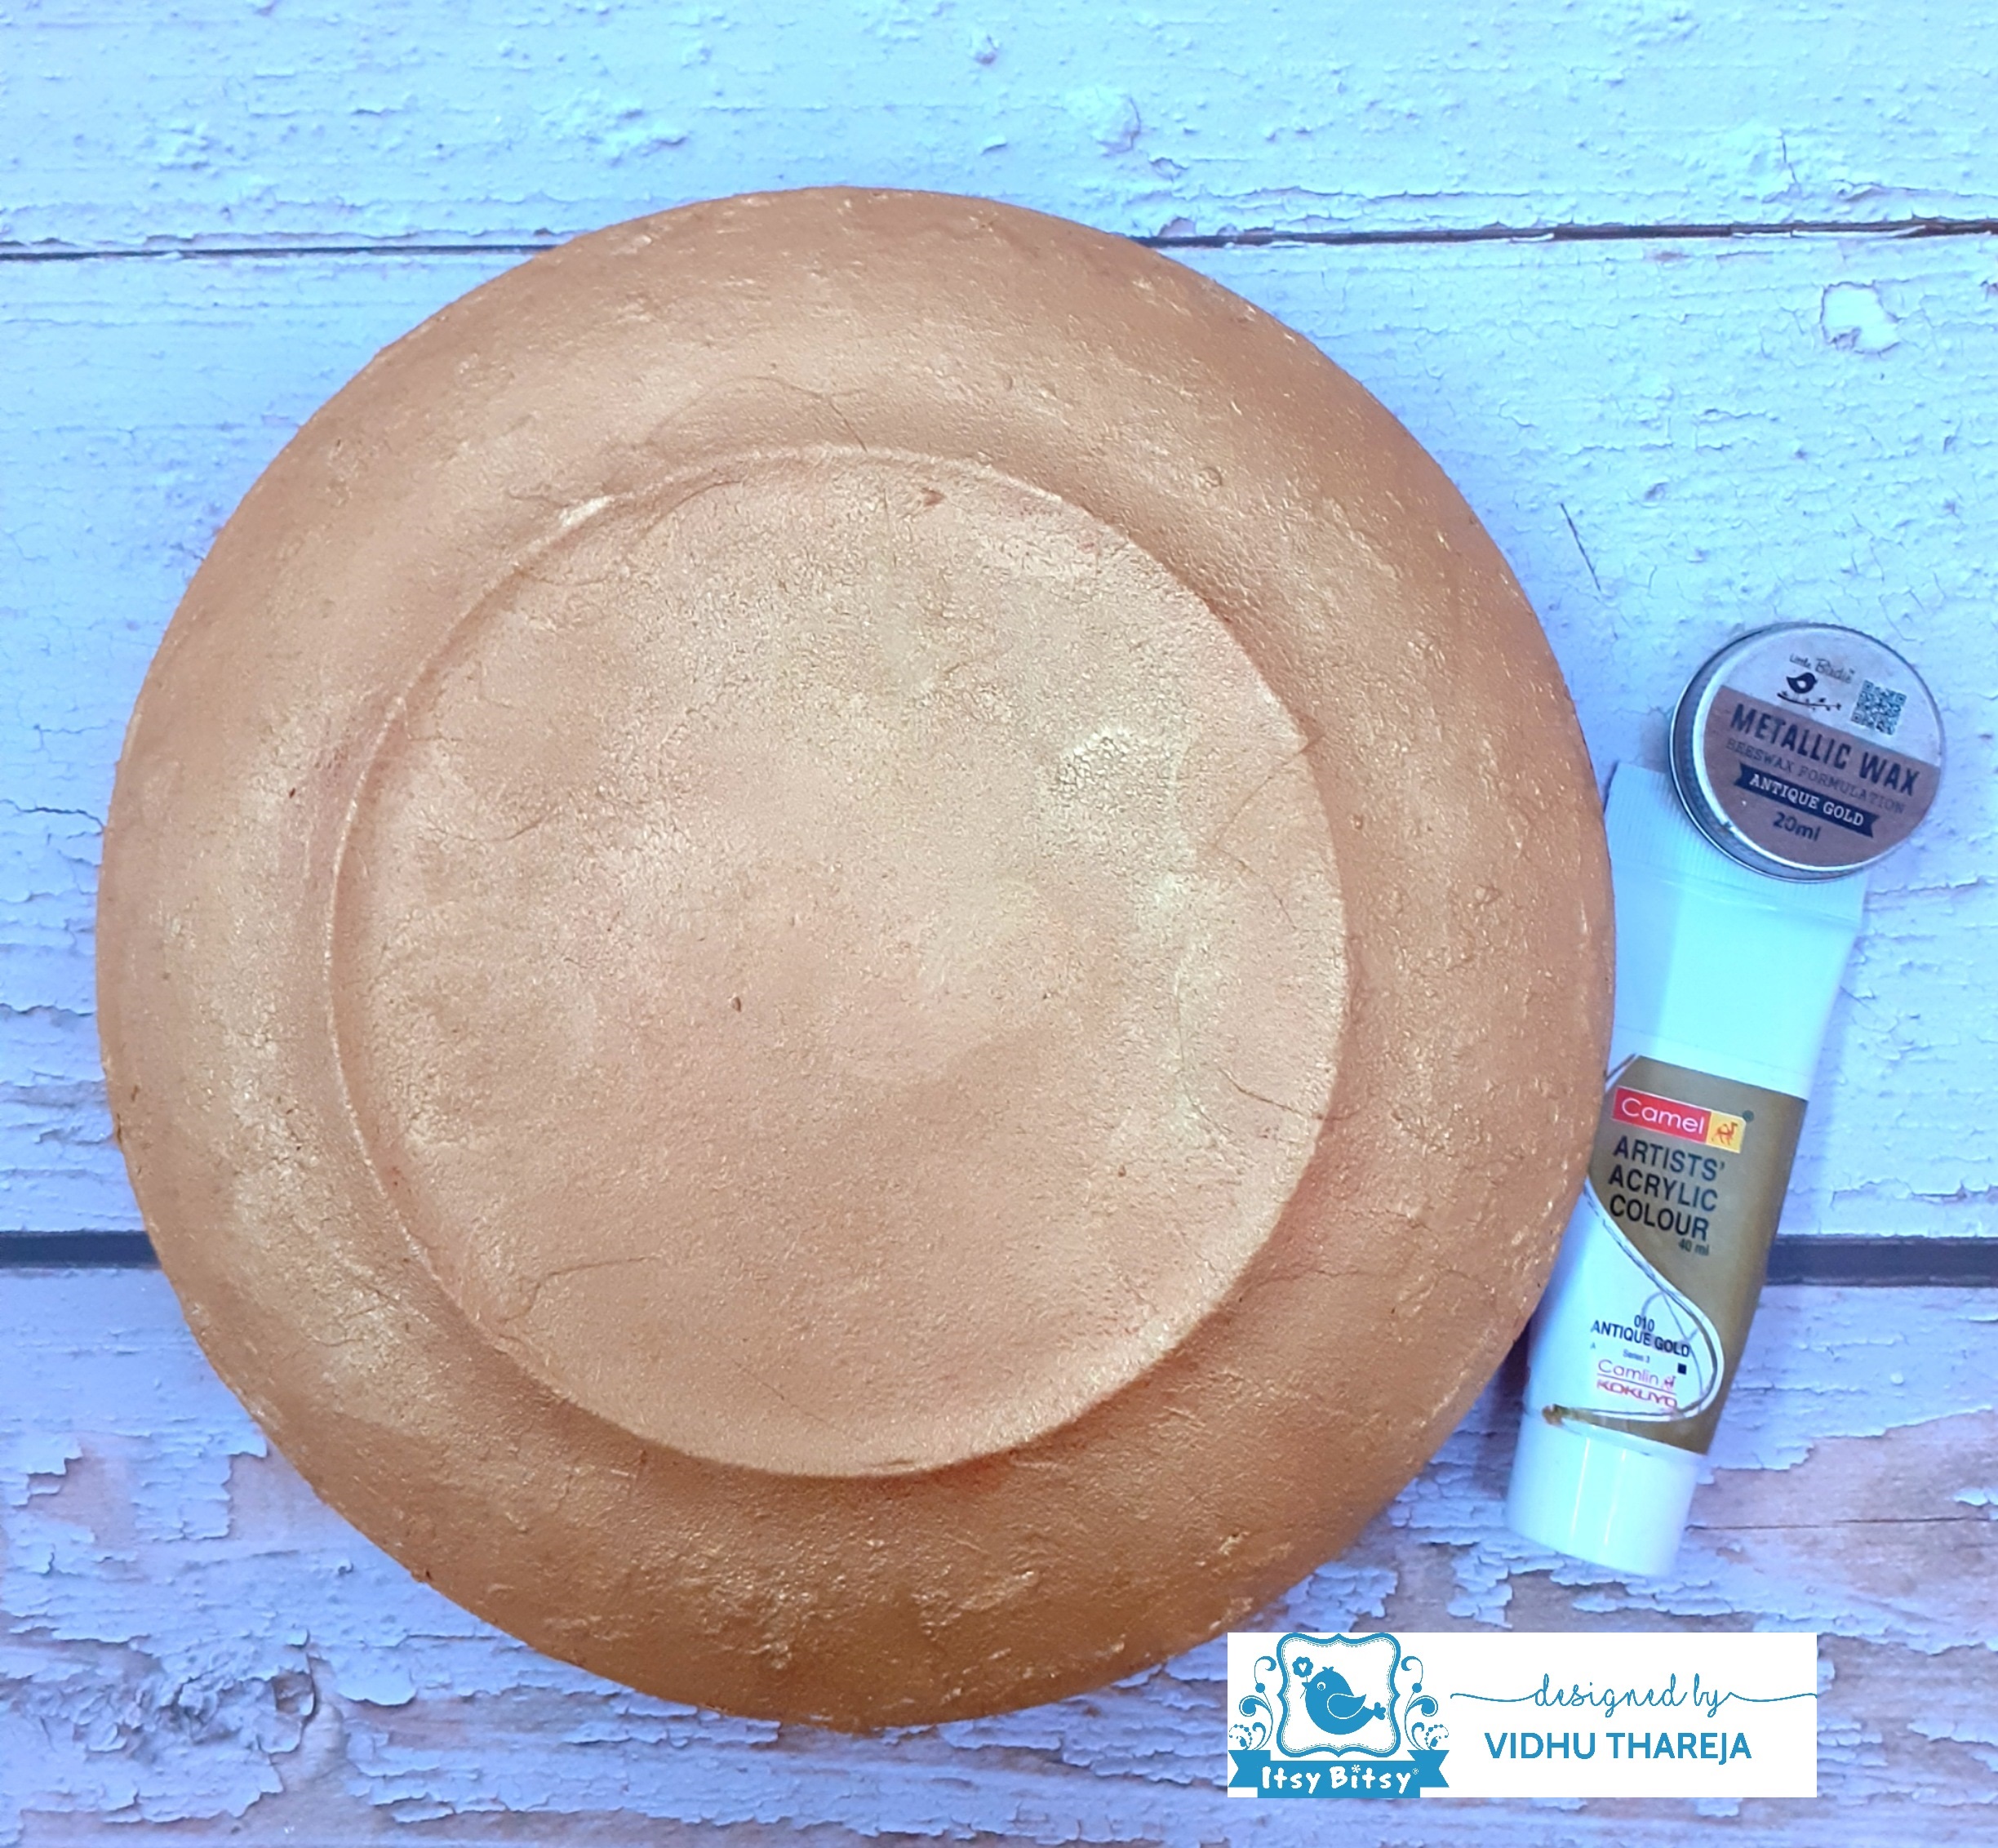
It is very important to seal the paint with varnish. Here I have used Little Birdie Decor Varnish, available in Matte And Gloss both variants. It is a water based varnish and dries very quickly, even in the humid and cold weather condition. Apply it with any synthetic brush and the brush can be washed under running tap water. Since this would be used as home decor so I applied multiple coats (about 3-5 coats) leaving enough drying time between each coat. Multiple coats makes our projects long lasting and they can be cleaned easily with wet cloth.

How to hang this decor piece was a big question for me. No matter how strong your adhesive is, the glass plate can always fall down. But now we don’t need to worry! Itsy Bitsy has multipurpose hangers, available in two sizes – 8″ and 10″. These hangers are removable and very easy to fix. Decor glass plates are safe to hang using these hangers. 10″ wall hanger is perfect for a 9.5″ plate.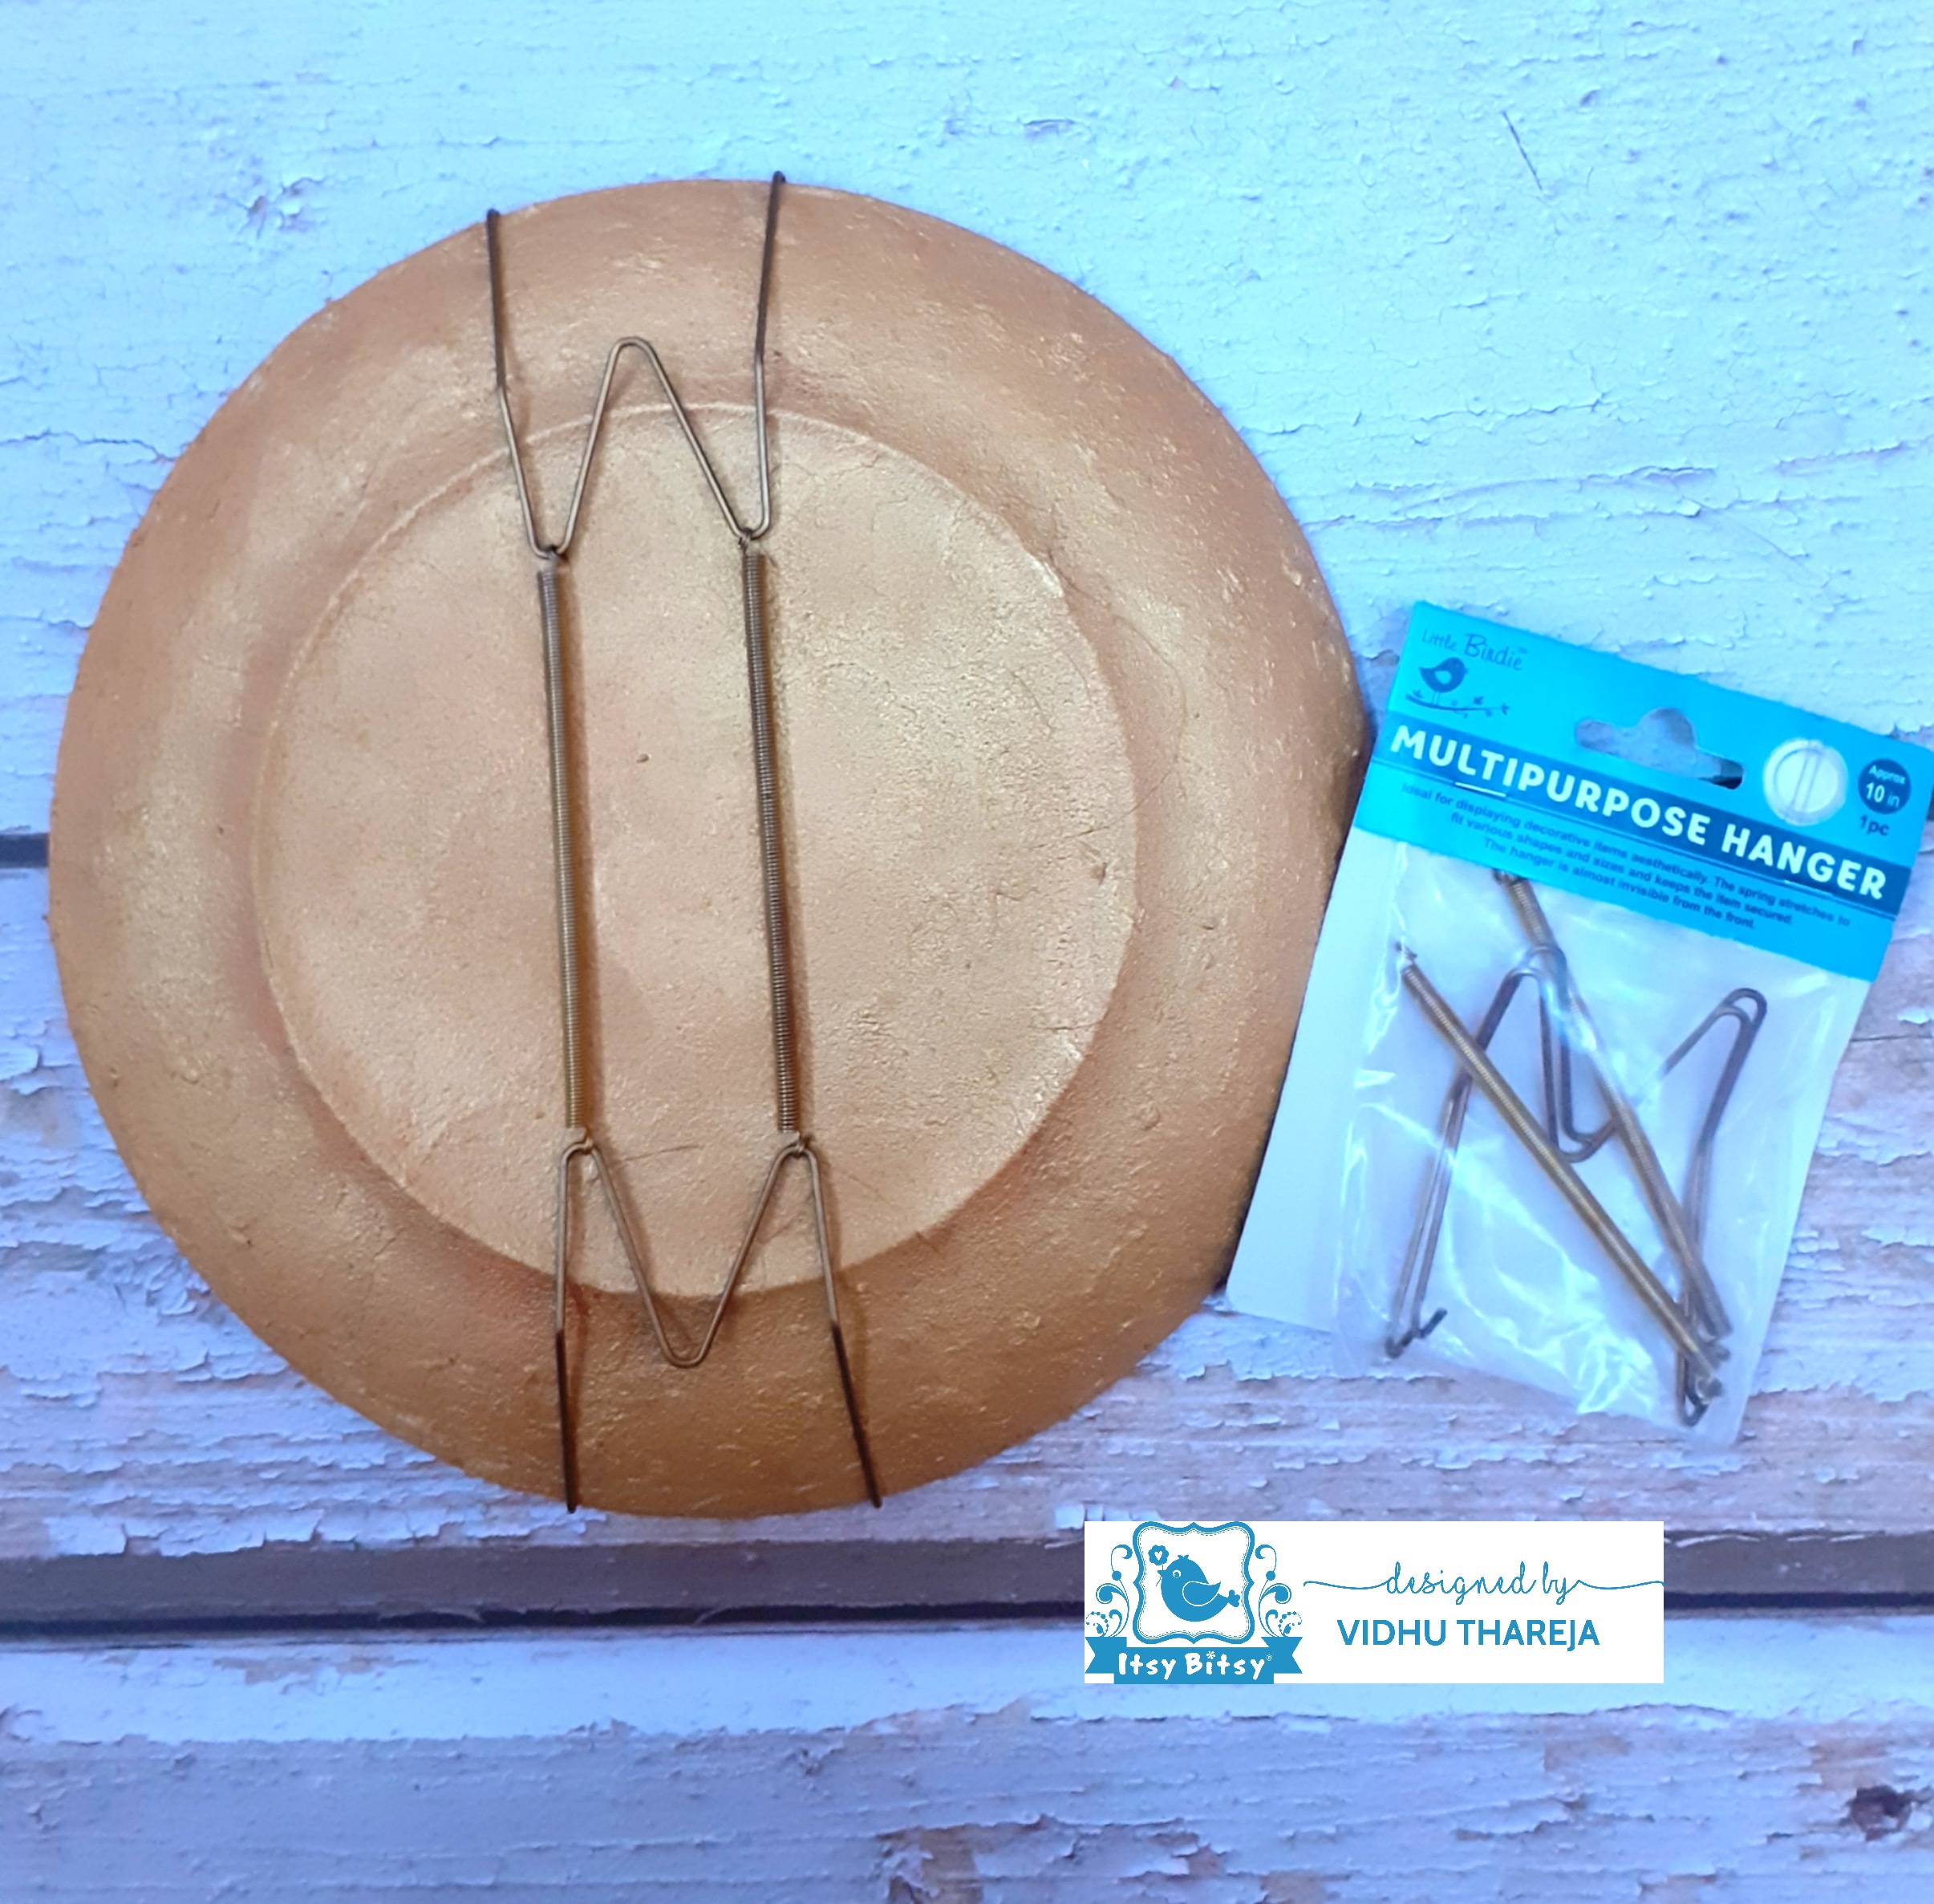
Now we can hang our decor glass plates without any fear. A bright and beautiful decorative plate is ready to add beauty in interior of any home. This makes a beautiful gift also.
I hope you liked my project and it has inspired you to create something unique and beautiful using the awesome craft supplies of Itsy Bitsy. Do participate in the blog challenge #33. We would love to see your creations.
I am excited to inform you that all these products come with a unique QR code!
Point your mobile phone at the QR code on the product & scan them to take you directly to our YouTube links where you can see how each of these products are used! Check out all our new products for QR codes in the future ( this will be either on the label or on cap of the bottle).
Use code VIDHU5 to buy any product at www.itsybitsy.in and get 5% discount on your total bill.
Explore, Imagine, Create!!
Vidhu Thareja
List of material used :


Beautiful project.. Love the filament paper ..
thank you so much