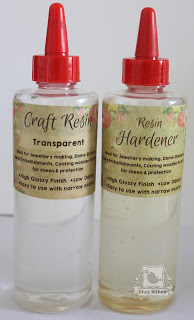
Itsy Bitsy resin comes in various colors, here I have used the clear resin.

You would need following items before you start working with Resin:
- Measuring cup or if you do not have any then just take disposable paper cups and mark them.
- Small plastic spoon or Popsicle.
- Surgical gloves (avoid touching the resin mix with bare hands), you can get them at any pharmacy.
- Toothpick (if you will be working with very small areas)
- Glitter dust (make small batch of resin and mix any color of glitter dust to achieve some great looking pieces)
- Sparkle dots
- Straw (this would come in handy if bubbles arise after pouring the resin. A light blow with straw and you would be able to get rid of all the bubbles.)
Tip: If you do not have gloves at home and by mistake touch the resin do not panic, just rub any oil(hair/body/cooking oil) and wash thoroughly with soap.
Another tip I would suggest is keep all your pieces ready and then make the resin batch in small quantity to avoid any wastage.Resin and hardener mix would have a work window of 5 min approx so you can pour into all your findings simultaneously. As for the curing,resin takes 24 hrs to fully cure.
I would be making rings, pendants, earrings.So lets start…


I also used metallic paints (teal metallic paint, broccoli metallic paint) to paint these bezels.


You would require Flat Aluminium wire, these come in various colors and are easy to bend and cut. I took the wire and bend it into square shape with the help of Jewelry pliers (Chain Nose Mini Pliers and than cut with help of Side Cutting Pliers). Next adhered the empty square piece to clear tape.

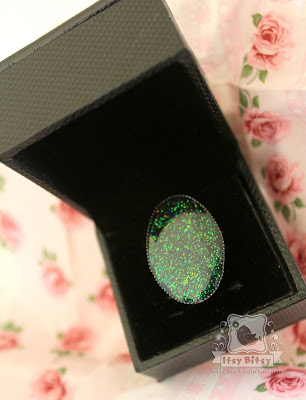
I have used the beading wire to wrap the square resin piece to form it into a pendant.

I repeated the same procedure of adhering these metal heart charms to the tape and then firmly pressing it so no space is left for the resin to flow from beneath the charm. Once the resin has taken its time to cure (24 hrs), remove the tape and if you find any tape residue on the resin just wash it with mild soap water and pat dry.
For these earring pairs I made very small batch of resin mixed with different colors of glitter dust and then poured with help of toothpick as the the design is very intricate.


For this I painted both sides of the frame, each in black and silver colors. Adhere the chipboard frame to the tape and poured clear resin mix into the center of the chipboard frame and use popsicle to spread the resin evenly in all directions. Here I did not mix the sparkle dots in the resin mix but put it while the resin was wet.


amazing use of the resin and thanks for sharing in detail !! love each one of the creations !
Lovely creations. Thanks for sharing
Hi Lekha, Thankyou for the tutorial, have never used resin before but definitely would like to try it after this.
It was mine first time too…its super easy ..do try and share with us your creations..
thnku so much:)
<3 thnkooo
Beuatiful creations!! Thanks for the tutorial ?
what a brilliant post on Resin jewellry!!! thank you so much for the tutorials…
Fantastic creations Lekha! Loved all of them!
wow..Awesome jewelry pieces 🙂
Thnku so much
Thnkooo ?
? thnku
Thnx…do try and share ur creations
Thnx…do try and share ur creations