At
ItsyBitsy we are keen to present new ideas and perspectives on craft which is why we will frequently be inviting guest crafters to add their creations to our blog. I am very pleased to say that Dr. Sonia of
Cards and School Projects has returned for another fabulous GD post. This time it’s all about recycling and making something new and beautiful from something old. At the same time I asked Sonia to include
pattern papers in her creation since that’s the theme of the month here at
ItsyBitsy. I never fail to marvel at her creativity and I’m sure you will too. Over to Doc!
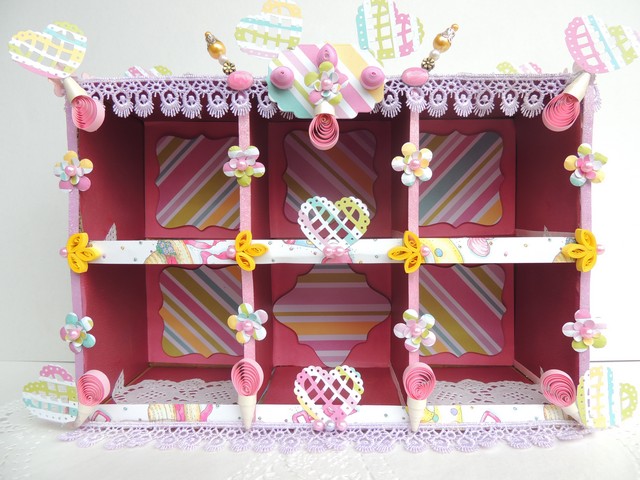 |
| Shadow Box |
Dear readers first of all let me share a secret..I don’t craft much with pattern paper ..not that I dont like pretty paper ..I just cant bring myself to use it !!
[I was actually sorely tempted to tell Sunehra I couldn’t GD for this theme!]
To feel better about cutting up pretty paper, I recycled a cardboard box into a shadowbox using mostly a single 12 x 12 sheet of pattern paper
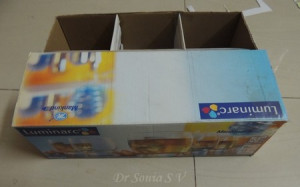 |
| Recycling craft |
I cut and glued the flaps of the box to make the compartment of my shadow box
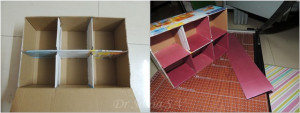 |
| Recycling craft |
I used the gorgeous pearlised paper to line the compartments of the box.[I buy this from Itsy Bitsy in huge chart paper size rolls as they are so versatile..they come in handy for punchcraft,school projects,card making and recycling!]
I die cut , punched ,cut borders out of and made punch-craft flowers all from one single pattern paper[okay..call me stingy!!]
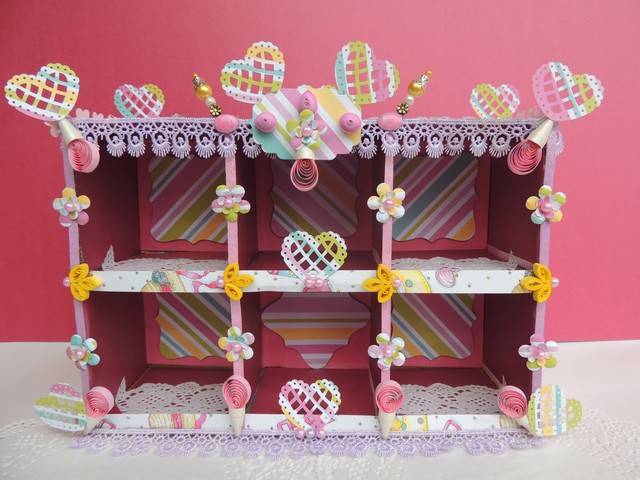 |
| Shadow Box |
I have used the Victorian square and Itsy Bitsy Venetian die to cut the patten paper
All the the flowers in this project were made using pattern paper ,punches and some gorgeous Itsy Bitsy pearls
 |
| Punch craft flowers |
On the Itsy Bitsy Venetian die cut banner, added some quilling , punchcraft flowers and used some gorgeous Itsy Bitsy epoxy stones on the sides.
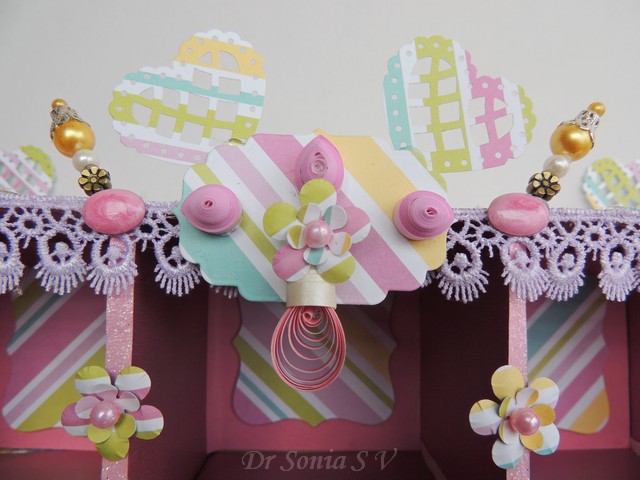 |
| Quilled Flowers |
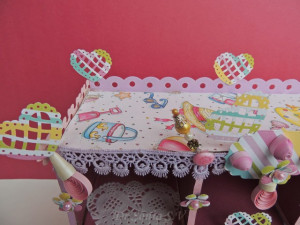
Here is the side view of the shadow box with
flowery borders and a beautiful cheerful pattern paper.I used the versatile
glitter strips to line and highlight each compartment
 |
| Shadow Box |
The lacy hearts were made using an MS punch..You can make a similar design using Itsy Bitsy’s own new 2 in 1 Lacy Heart punch
 |
| Shadow Box |
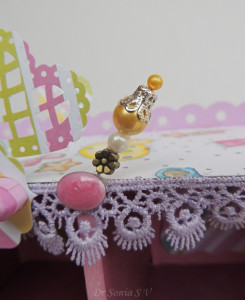
Here is a closeup of the homemade stick pin
 |
| Stick pin |
Most of you may be knowing how to make one..but I made my first pin only recently so to help others like me sharing how to make a stick pin
 |
| Stick pin tutorial |
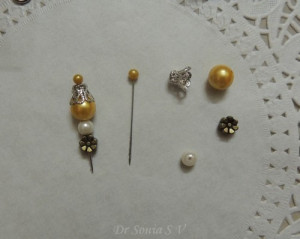
I used a beaded pin , flower caps , pearls and a glue gun to make a stick pin. Thread the flower cap onto the pin as shown and put a bit of hot glue into the cap..thread in your big bead immediately.
Apply a thin thread of glue on the pin stick and thread the rest of the beads and your stick pin is done! [You just need to work fast but carefully so as to not burn yourself!]
 |
| Stick pin tutorial |
Here is the aerial view showing the scallop and flowery borders on the roof and doilies on the floor of each compartment
 |
| Shadow Box |
So many wonderful entries have already poured in for the Pattern paper challenge and I am mesmerized by the display of creativity. Thank you so much Sunehra and Itsy Bitsy for inviting me to GD once again.


Very creative!
AWESOME project Dr. Sonia and you used pattern papers, punches, pearls, glitter strips fabulously! You are queen of recycled and 3D projects! Hats off to you..
This is amazing.. I think this is the first project ever where I have seen you use PP doc.. Now don't just stop here… continue using them for you use them awesomely well… 😀
Thank you Khush…I hate to cut up pretty paper and always marvel at how easily you used to use so many pretty papers for the circle books and fancy folds you make Khush.
Thank you Sindhu I tried to epitomize some of my favorite Itsy Bitsy products namely Punches, Jewelry making Supplies,Papers,Affordable Dies,and the versatile Glitter strips
Thank you so much Sangeetha
Fabulous Project Dr Sonia …you really are a queen at recycling !! it never ceases to amaze me how you take everyday things and convert them to beautiful pieces of art …your shadow box is so gorgeous .. just love all the details 🙂
This is very pretty Dr Sonia… love the details!!
very nice recycle craft. like that pin
Thank you Asmita . I used to think it was very difficult to make the pins till I experimented one day!
Thank you so much Berina…so sweet of you to drop in a comment to encourage me
Ha Ha Thank you Hussena.. I think that can also translate to “Queen of Junk” !!
This is so pretty doc!! It looks like a cute doll house! That pin idea is so cute. I have tried it many times and its so much fun coz you can make one matching your project. Thanks for sharing yet another wonderful project.
that is soo pretty..Sonia..u rock!
Thank you Indira and you hit the nail on the head..that is exactly what my daughter converted it into..a doll house! I got the “flower caps” only recently from Itsy Bitsy and using it the pins looked so much prettier..earlier the glue would make an unsightly big blob..using the flower cap..it hid whatever mess I made!
Thank you Smita for supporting me.
Another creative showcase from you Sonia…it has tought us how to fully utilise a pattern paper as well.
It's better to be stingy than to waste these pretty papers :))..
Oh thank you Nitijita…I so hate to waster paper be it pattern paper or any pretty paper I see in a calendar,magazine or gift wrap!
Its awesome Sonia..Just loved it :):) I love those hearts. Loved ur blog too..
Thank you so much Swathi..was so pleasantly surprised to drop in on your blog now and see the same paper in one of your cards!!
Hey gorgeous box again dear sonia!
Same with me, I can not bring myself to cut lovely pattern paper 🙂
Thank you so much Lavina..ha ha join the boat but I bet you would use it in those gorgeous scarpbooks of yours as that way you can save it for eternity!
wow.. very nice
Thank you so much Faiza
We know from this blog how to create Pattern Paper in Recycling crafts
recycling paper
IT Ewaste offers Electronic Recycling, Computer Laptop Recycling, Mobile Phone or E Waste Recycling Services.