Hello Everyone
Daizy Patel this side.
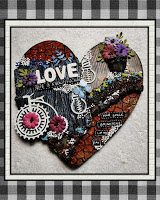
Today I am going to share with you step by step tutorial on how I created this cute wall decor. I hope you will like it.
As February is fondly called the Love Month, I have named my project Sweetheart.


Step 3: I used Little Birdie’s GOLD RUSH Color Splash to add red tone to the background. I also used Little Birdie’s White Chalk Paint and Grain Tool to Create Stripes on the black area.


Step 4: To add more interest to the background I applied Little Birdie’s Stone Texture Paste APPLE MINT and Red Micro Beads. I also used Little Birdie’s Charcoal and Lime Splash Color Splashes to create road kind of look.

Step 5: I took some Popsicle Sticks and joined them using Little Birdie’s Heavy Gel Medium. I applied Little Birdie’s Mixed Media Modelling Paste to give some texture to it. Then I colored it with Black Chalk Paint and applied Little Birdie’s ICY GLAZE WAX to highlight the texture.

Step 6: I selected Primed Chipboard embellishments and gave them a coat of white chalk paint just to make them look extra white. I also added handmade flowers and assembled everything as desired with the help of Heavy Gel Medium. To enhance the interest I added Little Birdie’s Mini Craft Pallets too. And to adhere them I used Little Birdie’s Soft Gel Medium (Gloss). It also gave uniformity to my project.
To add more of natural effect I used Little Birdie’s Embossing Texture Paste Avocado Smoothie and Aquatini. I as added a little butterfly from THE AQUA MEDLEY paper pack…


I hope you will like it. Than You for Stopping By.
Happy Crafting.
—
Regards
Daizy P. Patel
Beautiful ❤️❤️