Hello creatives…

With the festive season on & with the launch of gorgeous decoupage filament papers, let’s make some gift boxes for our friends & relatives. Here is one way of adding an exciting look to your gift boxes….
Let’s get started
step 1:
I was hoarding this wooden box from ages, thought of decorating it. You can get one from the store.
Give a coat of gesso as a primer & a coat of chalk paint complimenting to the colours of your selected filament decoupage paper.


Step 2:
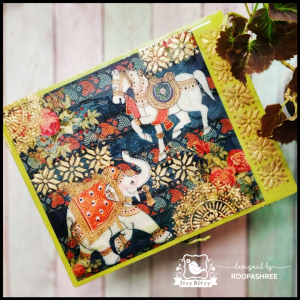
Cut the required size. I decided to add some gold gilding on it. Stick the decoupage filament paper & on the empty area create a pattern with a stencil and gilding paste. Let it dry. It takes about 20 to 30 minutes. It will turn transparent. Now you can work on the gilding part. Similarly on the filament paper I have created a stencil pattern to add some gold gilding on the paper too.


Step 3:
On the sides & at the front of the box I have done some embossing work with gold embossing powder.

Step 4:
I also painted the inner part of the box with a contrasting colour matching the filament paper. Once it was dry, I gave a coat of resin on it.


Few click of the gorgeous box.


Material list.
1. Decoupage filament paper.

Little Birdie Decoupage Filament Paper A4 Size 2Sheets -Royal Ride LB
2. white gesso

Little Birdie Acrylic Gesso 100ml- White
3. chalk paint

https://itsybitsy.in/search?type=product&q=chalk+paint
4. Gilding paste

Little Birdie Gilding Paste- 100g, 1Pc
6. Gold gilding flakes

7. Deco Magic

Little Birdie Deco Magic Glue Glossy -450ml
8. Stencils

https://itsybitsy.in/search?type=product&q=stencil
9.Art resin

Little Birdie Epoxy Art Resin & Hardener- 250ml + 125ml, Transparent, 1pc
8. Embossing powder

Little Birdie Embossing Powder Gold
Hope you like the project & process.
Share some Love ❤ & like
Roopashree